Image Map

September 30, 2011

Fall Door Decor: Apple Bushel Baskets

Well Happy Fall Y'all!  I hope each of you are well on your way to getting your Fall decorating on...I can't seem to stop this year.  By the time I am done and sit back to look at it all...I will probably be taking it all down and putting up Christmas stuff!
Actually...this apple basket project has been on my mind for awhile.  I think it is due to the fact that I have these completely UNINSPIRED wreaths on my door.  Oh they were just fine for our first Fall after we moved into this house a little over a year ago.  I had been in a quandary because we suddenly had a double door entry.  So I just made 2 wreaths with dollar store bunches of leaves and left it at that. I do really like them but they are lacking a bit in personality.

Fallish? Check. 
Doors covered? Check.
Totally loving it?  Hmmm...not so much. 
But this year I wanted to go a totally different route. So I came up with these apple baskets to hang on the doors.  They ended up surprisingly easy and quick. And so unique and versatile!
I am still not 100% positive I am in LOVE with them for door decor but I decided if I come up with a better door plan...they are still PERFECTLY useable elsewhere.

Here's how I did it...
I just realized I spelled raffia wrong through this entire post.  I have moved on. :)
The first thing to do is make the fun little Apple Sign (or SIGNS if you have 2 doors like me). Just take your simple wood square plaque (snagged it for.99) and glue 4 craft sticks to it to form a frame.  Do this by hot gluing the top and bottom and then the left and right sides. Then it is time to paint them.
I have no idea if my painting technique has a name. I would have loved to take photos for you but my hands were covered in paint and I was not picking up my fancy schmancy camera. Here's what I do...

I start by layering with 3-4 coats of different colors of paint. Next, I dry brush over each layer with white paint to distress it.  In this case I used blue and green layers to match my front door and the apples.

When each coat got tacky I would paint on another one.  Then I covered those layers with a brown color.  When the brown got tacky I would basically begin rubbing the paint off with my fingers by pushing and rolling the paint into flakes.  My goal was to make it look like like different coasts of paint chipped off over time. Then I would dry brush that too.  The letters were just stenciled with alpha stamps and when dry I dry brushed over those with white paint to look faded. 

The last step is nailing the framed sign (the nails are all crazy on purpose because they were too long but I like the effect) into the wooden stake.
Now for the basket.  This is where you use your floral foam. 1. I, of course, am cheap thrifty and use what I have on hand and found this square of styrofoam in some box. The styro/floral foam will anchor your sign in the basket. 2. I cut mine in half since I needed two. 3. Place it where you want your sign to go.  I wanted mine towards the back but make sure you position it where the handle can still be used to hang it up if you choose to. 4. Stick your sign in there. Awesome.
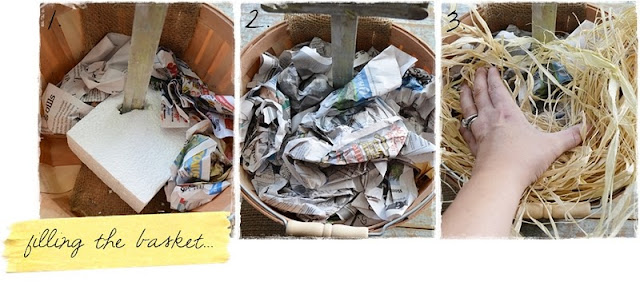
1.  Now stabilize your foam with crumpled newspaper so it can't move or fall over.
2.  Lightly fill the newspaper to about 3/4 full but don't pack it too tightly.
3.  Fill the top with raffia until the newspaper is covered.
Now for your apples.  Obviously we need to make sure the apples don't roll out of the basket. Since these are made of styrofoam, it makes it easy to push skewers through them and stick them through the raffia and newspaper.  I used 4 inch ones but regular ones would probably make them even more stable. In the above shot, I show you how I poked them through a different part of each apple (blunt side in, point side out) so that in the basket, they look natural like they were just dumped in there.

I think my favorite part was arranging them in there.  It was so much fun and even my 5 year old helped me.
Just wanted to show you it really works. :)
Then I just cut a length of the burlap garland, looped it through the handle and tacked the ends to the tops of my doors.
So simple and fun.  And I think pretty unique too!
How cute would these be with bunches of pumpkins and gourds in them?  Or pinecones and leaves?
What do you think?

Hugs to all of you!
Just know I appreciate each and every one of you.  Your comments.  Your pins. Your friendship.
And I wanted to extend a special thank you to all the lovely features and comments for my yarn wrapped gourds and pumpkins.  I am completely humbled and overwhelmed by such encouragement.
You all bless me so much.

P.S.  I am so excited I have to share...we are going to a REAL pumpkin patch tomorrow!  We have not done that in all the 8 years we have lived in Florida.  These are the times I miss living further north. I will take lots of pictures and share them with you!  And we are getting a cool front...85!
That is like long sleeve weather down here!

September 26, 2011

Fall Leaf Napkin Tags

You have no idea how many times I pushed back space and deleted the title of this post. What to call these was completely lost on me but I think the best title for them are TAGS.
So I came up with these super cutie patootie Leaf Tag Ties.
First off...these little leaves were made with simple modeling clay.  Now before your eyes glaze over as mine did whenever I read about someone making things with this medium I beg you to keep reading for no other reason then you are already here...you might as well.  
And as your friend...I'm asking. :)
And I am a nice girl.
And I may make you baked goods for obliging.
See? Nice.

No really...they turned out pretty darn cute after having the best time with this stuff.
I have never used clay. Ever. OK, in my college art classes I did but I was thinking of minoring in art so it kind of went with the territory. But pursuing it on my own? Nope. Yet I saw it in Wal Mart the other week and the next thing I knew it was in the buggy (cart). Had no idea what I was going to do other then the idea of grown up play doh intrigued me.  Shape it and bake it?  I'm in.
First, I bought some mini cookie cutters and paint from the new Martha Stewart Line from Michael's.I rolled out the dough and cut out my shapes.I created veins in the leaves and a little hole with a toothpick.
Baked them at 275 for about 20-30 minutes. 
Once they cooled I painted them fun colors and painted the veining white with a toothpick.
The girls wanted in on the fun so they made and painted some too.

After the paint dried, I just threaded strips of raffia through the holes and tied them around these fun and colorful napkins I use each Fall!
How stinkin' easy is that?  Plus I completely adore that this can carry though to Thanksgiving.
 There is some great potential in using this clay stuff. I have 8 gazillion ideas for making hostess gifts to give to neighbors and friends.
A mason jar or brown kraft box of goodies wrapped with these tags for holiday well wishing? 
Perfection!

Seriously...be honest now...did you zone out on me or do you think this would be something you would try?  It really is easy. It's like baking cookies and the painting is like icing. You just can't eat them. (which makes me only a little sad like when I finish one of those little chocolate pudding snacks...it seems over way too fast). 


Happy Fall Crafting My Sweet Friends!
Oh and I have a few more Fall-y crafts coming your way.  
Hope I don't overload you but this season is just way too fun!

September 20, 2011

Yarn Wrapped Gourds & Pumpkins

Aren't these just the coziest, cutest little things?  
Almost makes me want to curl up and snuggle with them. Almost.

As a lot of you know...I love yarn crafts.  Anything with texture.  Yarn has so many possibilities and I believe these little $1 store pumpkins and gourds have been transformed into some pretty spectacular Fall decor pieces.

I bought those little mini gourds and pumpkins by the pack (5 in each) at the dollar tree and I think the bigger gourds and pumpkins are from Wal-mart at 97 cents each. All of them are FAKE PUMPKINS because I wanted each of them to last! I used different yarn gauges in ivory, green, and a mustard yellow to wrap them in different ways and make each one unique.This green pumpkin (which kinda ended up looking like an apple but I truly love it) was done simply by gluing the yarn around the base of the stem and then continuing to wind it around while applying glue. I prefer to use hot glue because it keeps it in place due to drying faster.  Even though I'm used to working with a glue gun, I still burn myself at times so if this is a kid project for you...use craft glue like Mod Podge or Aleen's Tacky Glue. Craft glue really does work great but be careful not to press too hard as you conform the yarn to the shape because it can cause hard glue spots.

Also, I loved the real look of this stem so I left it as is.
These little gourds and tiny pumpkin make me smile too.  Same technique as the green pumpkin but I just varied it a bit by going horizontal or vertical. The large gourd is wrapped in twine and the stem is wrapped in green embroidery floss. The smaller stems are made from twine bent in half and hot glued together.  I frayed the ends and kind of smooshed it on the top of the pumpkin or gourd to make it look like it grew out of the top.
Oh, I love this white pumpkin so much.  I twisted 4 strands of yarn together measuring them the length of the pumpkin from stem to bottom.  It reminds me a bit of a cable knit sweater without the knitting. The green stem is wrapped with twine to add even more texture. Craft glue worked best with this technique too.
These are not exactly rosettes but they are similar to the way you make fabric ones.  This mustard yellow pumpkin comes off sophisticated to me.  I think these in all white would be striking with maybe some touches of green.

The tricky part in making this style is rolling them into TIGHT spirals and then using craft glue to put them on. Start by tying a knot at the end and then rolling it between your thumb and index finger. Once you get a spiral you like, they have to be pressed flat with glue. So hot glue does not work. Incidentally...my above pumpkin has been handled by two 3 year olds and a 5 year old. Hence some of the spirals coming loose. 

The spiral rosettes are simple but it does take some time to finish one pumpkin.  But I think the effect is completely worth it! :)
Hope you like another yarn wrapped project I came up with for Fall!
Do you see yourself making these too?
 I would love to hear what you think. :)

Cozy Fall Hugs to all of you!

September 16, 2011

Decorative Fabric Birdcage Tutorial

In case you may have missed my post as part of Eighteen 25's Spooktacular, I wanted to repost and share my fabric birdcage tutorial.

Let's get right to it!

Here's the materials you need...
Oh and a glue gun!  You need a glue gun too. :)
BTW...I actually do have larger bottles of fabric glue. I just like using the small ones for some reason. 
Next...pick out some pretty, Fall colored fabric and you're all set to get started.
 Cover your hoops with fabric:
1. Cut your fabric into several 1 inch long strips. I did this by folding over the 2 yards of fabric several times.
2. Separate both your embroidery hoops and wrap the fabric strips around both outer hoops but only one inner hoop. Leave the other one unwrapped. Wrap your ribbon spool too.
3. Now your hoops are wrapped (ignore the extra one shot in my photographic haste).
The bottom of your bird cage:
4.  Now take another coordinating fabric and place a square of it over the unwrapped inner hoop and put the one covered outer hoop over the top and tighten it.
5.  Trim the excess fabric and glue any loose fabric over the bottom edges.
Now to make your fabric covered wire:
6. You need your1 inch wide strips of fabric, 10 yds of floral wire cut in 2 ft lengths, and fabric glue.
7. Lay your wire in the middle of the strip and line a section of the top of the strip with fabric glue.
8. Pinch it closed as you work your way down the whole length of wire.  I did this with 8 lengths of wire but you can do more. This is probably your only time consuming part. Trim any frays and excess fabric along the length to clean them up.
Now to form the top frame of the bird cage: 
(I actually did the left example with uncovered wire so you could see it better)
9. Grab your ribbon spool and begin wrapping the ends of 4 wires around the ribbon spool at 12, 3, 6, and 9 o'clock positions to anchor it.  Once those wires were in place I could do the sections in between (where the dotted lines are).
10.  It should like this at the top when you are done with the real thing.
11. Now you just slide one covered 12 inch embroidery hoop up the wires like putting on a skirt (wires on the INSIDE of the hoop.  Hot glue them in place on the inside of the hoop.
Do the same thing with your second hoop ensuring it looks even in between them. 
12.Stretch your wires as straight as you can to form the body of the cage. Hot glue them to the outside of your embroidery hoop at the bottom (the one with the coordinating fabric on it). 
Even the wires until the cage looks straight and cut off excess so it does not fold underneath.
That's it!
Look at your pretty bird cage!
I even fancied it up with some girly little flower embellishments and clipped them to the side.
Then I made a little stuffed crow (though when I stared at it too long it started looking like a seal with a beak).  I sewed him together with a quick blanket stitch and sewed two eyes with orange embroidery floss. 

To anchor my crow I added a shorter length of fabric wire, wrapped it around the sides to make a perch and then threaded a line of fishing line from the top of the cage, down through the bird, out the bottom and sewed him to his little perch bar.
But you really could just buy a crow from the craft store, name him something cute like "Cornelius," show him his new home, and call it a day.


Here's a printable with templates to make the flowers and crow.
(designed for personal use only..thanks!)
Hope you like my little fabric birdcage and are inspired to make one yourself.  There are so many variations to make this...use wood dowels for the body to make it more realistic...spray paint it a fun color...I adore all the possibilities!  And a great idea for different seasons too!

Have a great weekend sweet friends!

September 15, 2011

Fabric Leaf Frames

 Happy Fall Y'all!
Honest to goodness I am just plain giddy to be actually posting an actual post.
And awake to blog about it.

The busyness of this year's schedule has shocked me and I never realized how much I need crafting as an outlet.  So all my projects are taking longer but I have a bunch up my sleeve for the Fall season. I hope, I hope, I hope I can get to them and share them here with you wonderful friends.

All righty.  Enough of me going on about my schedule.

This little project appeals to the seasonal decorator in me that I am shocked I have become. But I embrace it with ridiculous gusto. If you would have told me I would have taken frames that held other things...and changed them each season...I would have laughed. Usually, if I nailed it to the wall...it stayed there until it fell from my hasty handy work or I moved.

But now it irks me to have a pastel or summer looking frame of prettiness on the wall mocking me in my sea of orange, green, yellow, and brown things.

So I take them down and Fall-ify it.  Oh yes.  I made up that verb word.
For this project, I began by backing both of these frames with burlap. I then cut and embroidered (I use that term loosely) leaves to it using faux decorative ones as templates. I gave them a little dimension with some polyfil (no batting in the house) and used color coordinated embroidery floss. Because it is a little three dimensional I removed the glass for this frame.

I love to hand sew things and my style is primitive and childlike.  I love the look of imperfect stitches and I freehand my letters.  This totally would have been the word LEAVES but like I said...I free hand and ran out of space. LEAF it is.
This leaf I found in my sewing box that I made with fabric scraps and felt but I do not remember for what.
So putting this frame together took me all of two minutes. 
Hooray for fast and hoarding my stash!
If you are not a sewer you could do this with scrapbook paper, real (or faux) leaves, or just cut out the fabric and use it on the glass without a backing . A fun and easy project without too much prep or time needed.
I do have more to share and I am hoping I can get another post out soon!

Oh and I have to know...do any of you do seasonal decorating?
Or am I in danger of having 10 boxes for each season filled with yard sale fodder because I can't stop my seasonal decorating mania? You have my permission to then commence with a blog intervention for me.

I will see it for it is...your love for me to stop the madness. :)

Smiles & Hugs!