Actually...this apple basket project has been on my mind for awhile. I think it is due to the fact that I have these completely UNINSPIRED wreaths on my door. Oh they were just fine for our first Fall after we moved into this house a little over a year ago. I had been in a quandary because we suddenly had a double door entry. So I just made 2 wreaths with dollar store bunches of leaves and left it at that. I do really like them but they are lacking a bit in personality.
Fallish? Check.
Doors covered? Check.
Totally loving it? Hmmm...not so much.
But this year I wanted to go a totally different route. So I came up with these apple baskets to hang on the doors. They ended up surprisingly easy and quick. And so unique and versatile!
I am still not 100% positive I am in LOVE with them for door decor but I decided if I come up with a better door plan...they are still PERFECTLY useable elsewhere.
Here's how I did it...
I just realized I spelled raffia wrong through this entire post. I have moved on. :)

I have no idea if my painting technique has a name. I would have loved to take photos for you but my hands were covered in paint and I was not picking up my fancy schmancy camera. Here's what I do...
I start by layering with 3-4 coats of different colors of paint. Next, I dry brush over each layer with white paint to distress it. In this case I used blue and green layers to match my front door and the apples.
When each coat got tacky I would paint on another one. Then I covered those layers with a brown color. When the brown got tacky I would basically begin rubbing the paint off with my fingers by pushing and rolling the paint into flakes. My goal was to make it look like like different coasts of paint chipped off over time. Then I would dry brush that too. The letters were just stenciled with alpha stamps and when dry I dry brushed over those with white paint to look faded.
The last step is nailing the framed sign (the nails are all crazy on purpose because they were too long but I like the effect) into the wooden stake.

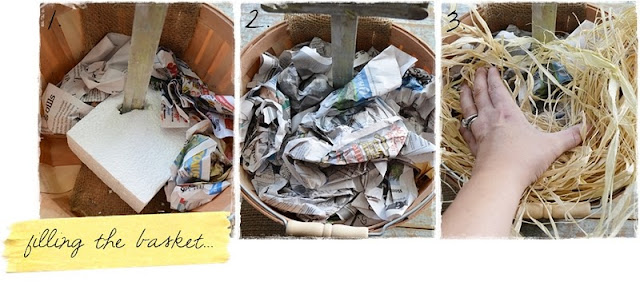
Now for the basket. This is where you use your floral foam. 1. I, of course, am cheap thrifty and use what I have on hand and found this square of styrofoam in some box. The styro/floral foam will anchor your sign in the basket. 2. I cut mine in half since I needed two. 3. Place it where you want your sign to go. I wanted mine towards the back but make sure you position it where the handle can still be used to hang it up if you choose to. 4. Stick your sign in there. Awesome.

1. Now stabilize your foam with crumpled newspaper so it can't move or fall over.
2. Lightly fill the newspaper to about 3/4 full but don't pack it too tightly.
3. Fill the top with raffia until the newspaper is covered.
Now for your apples. Obviously we need to make sure the apples don't roll out of the basket. Since these are made of styrofoam, it makes it easy to push skewers through them and stick them through the raffia and newspaper. I used 4 inch ones but regular ones would probably make them even more stable. In the above shot, I show you how I poked them through a different part of each apple (blunt side in, point side out) so that in the basket, they look natural like they were just dumped in there.
I think my favorite part was arranging them in there. It was so much fun and even my 5 year old helped me.
Then I just cut a length of the burlap garland, looped it through the handle and tacked the ends to the tops of my doors.

So simple and fun. And I think pretty unique too!
How cute would these be with bunches of pumpkins and gourds in them? Or pinecones and leaves?
What do you think?
Hugs to all of you!
Just know I appreciate each and every one of you. Your comments. Your pins. Your friendship.
Just know I appreciate each and every one of you. Your comments. Your pins. Your friendship.
And I wanted to extend a special thank you to all the lovely features and comments for my yarn wrapped gourds and pumpkins. I am completely humbled and overwhelmed by such encouragement.
You all bless me so much.
P.S. I am so excited I have to share...we are going to a REAL pumpkin patch tomorrow! We have not done that in all the 8 years we have lived in Florida. These are the times I miss living further north. I will take lots of pictures and share them with you! And we are getting a cool front...85!
That is like long sleeve weather down here!


 Just wanted to show you it really works. :)


 I rolled out the dough and cut out my shapes.
 I created veins in the leaves and a little hole with a toothpick.


 This
This 


