Image Map

November 29, 2011

Our Advent Calendar ♥

You know, there is something to be said for creative inspiration born of necessity. And I have wanted to make an advent calendar but I was unsure how or where to put it.  But my criteria was to make it, find a place for it, and use what I have but still try to make an impact.
So this is what I came up with. I love that it ended up looking like diorama but instead of a shoe box...I use an entire bookcase. To be more specific, I used a Billy Bookcase from IKEA. And the fact that I use the word "DIORAMA" further proves the geek girl that I am. At first,  I felt a little crazy starting this project but now...
I am IN COMPLETE LOVE WITH IT!
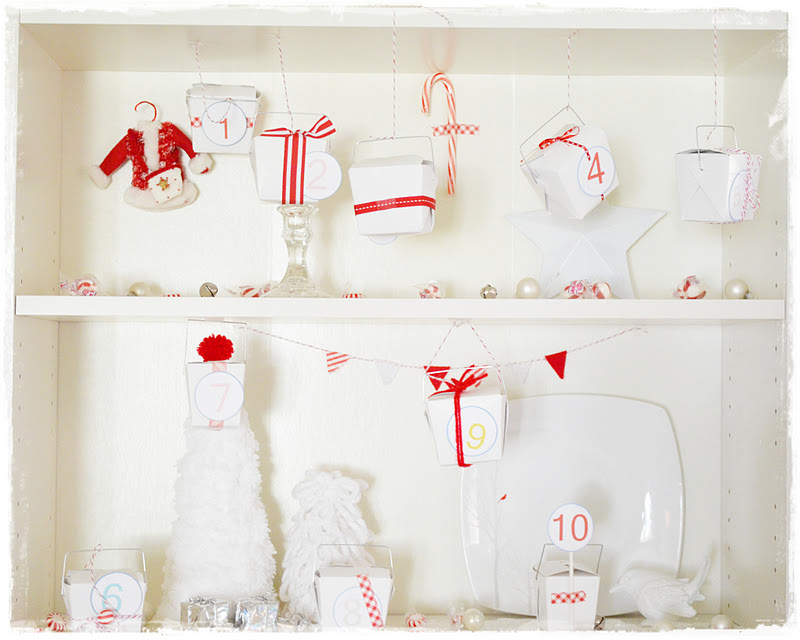
Each numbered box is a take out box leftover from my Fortune Cookie Thanksgiving Favors.
To decorate the shelves I basically "shopped my house."  I chose a red and white theme as my only criteria and just kind of threw things together from all over the house to make a sort of "scene" on each shelf to create the diorama look for the advent calendar.

The boxes contain an assortment of Christmas goodies like little chocolates, ornaments, stickers, or activities which I coordinated with my calendar.  Those activities could be baking cookies, doing a Christmas craft, or our family tradition of getting in our pj's, and driving in our car to look at Christmas lights while drinking hot chocolate and eating popcorn.  The girls literally talk about that one all year long. :o)
Within each box is also a little paper circle with an attribute of Jesus with a coordinating verse to read after we open each one. I got that amazing idea from  Milk and Cookies and you can find a printable included with it which is what I used inside my boxes. I am really excited to do this with the girls!
You probably recognize some things I have done on the blog already this season.  It gets kind of challenging incorporating a red and white theme so I literally pulled things out of nowhere if it fit the color scheme. Thread, buttons, doilies, little pots, yarn, etc.

Those little snowflakes back there are popped in a random bottle with sugar.
I am all for an "anything goes" mentality with free decor. :)
 BOX #17 DOWN!  BOX #17 DOWN!!!!!!
Whew.  Box #17 made it back up. ;)
Some takeout boxes and ornaments bravely lost their lives during this project.
I think I love the randomness of it best of all. Like using ordinary objects such as spools of twine or a mitten gift card holder to make the color scheme work.
 I'm also rather smitten with how some boxes are hung high, attached to the back of the bookcase or elevated by a candlestick or something.  The varying heights make it look interesting and fun although I think I should have backed the bookcase with a red fabric or wrapping paper or something. It looks too washed out up close but as a whole I do think it looks very pretty.  It is simple and fresh with the red and white.
I was going to do a separate post on these white trees but I wondered if y'all might be "treed" out by now.  But if you are interested, I used felt, yarn, and paper flowers for those and used straight pins for all of them so I could reuse the cones at the end of the season.
 Oooh...the final box.  Are you supposed to do Christmas Day on an advent?  
I see it both ways so I just went for it.
Are any of you weird like me and can actually SPARE a bookshelf for a project like this? I think it is a fun idea but I am sure I will do something new and different next year. And as we use each box, I will just decorate each shelf until we are done.  Yippee!  I get to keep decorating a little each week!
Merry, Merry & Fa La La 

November 28, 2011

Wreath Chandelier + Ball Garland: TUTORIAL

I guest posted a few weeks ago over at Stephanie Lynn's blog...Under the Table and Dreaming for her Handmade Holiday series.  It was loads of fun and all the Christmas projects were so inspiring.  I am posting this Wreath Chandy Tutorial here on my blog in case any of you missed it!

Let's dive into the tute! :)
1.  In my eagerness to get started, I began wrapping my 16 inch wreath form of STYROFOAM™ Brand Foam with floral tape prior to taking a "before" photo.  Sorry!  But here is what you need:
1 16 inch (or larger) wreath form of STYROFOAM™ Brand Foam
2 packages (16 count ea.) 1 inch balls of STYROFOAM™ Brand Foam
fishing line
textured white spray paint
4 faux pine garlands
2. Begin wrapping your wreath form of STYROFOAM™ Brand Foam with one of your pine garlands.
3. Push each wrap tightly together to make it thick. Tuck ends under the wrapped pieces.
4.  Here's your wreath wrapped with all 4 garlands.
5. To make the wreath look snowy, I used a textured spray paint that produces a flecked effect.
6.  Lightly spray it with a sweeping motion but don't saturate it in one area or it will become too white.
7.  When one side is dry, flip it over and do the other side.
8.  It takes at least 3 hours to become completely dry and will be stiff to the touch.
After it was dry, my husband helped me tie 4 strands of silver cording I bought at Joann Fabrics (99¢ per yard) equidistantly around the wreath in between the wrapped layers of garland.
Push the garland back around the tied cording to hide the part that is tied.
We attached the ends to an O ring (or in my case...a key ring I had on hand) and hung it from a hook on our ceiling after measuring the distance from the ceiling to above the dining room table. 
(I have cathedral ceilings which is why the hook is on an angle)
I ended up making 2 small garlands to crisscross underneath the chandelier using a 16 count package of 1 inch balls of STYROFOAM™ Brand Foam for each garland. You will also need Mod Podge, metallic crochet thread, scissors, the fishing line, and a yarn needle.
1. Begin by wrapping the 1 inch balls of STYROFOAM™ Brand Foam with silver crochet thread.
2. Wrap completely but don't worry if some of the white still shows.
3. Glue the ends with a bit of Mod Podge and let dry.
4. Thread each one onto fishing line using a thicker needle used for yarn.
I also strung silver bells to make this pretty garland. I tied a loop at either end of the fishing line to hang it up using ornament hooks.
Now for the fun part...decorate your chandelier! I used all silver ornaments to give it some sparkle.
Here's a shot underneath.
Yes, I totally laid on my back on the dining table to take it. Cool shot though, right? :)
It's so pretty hanging over the table and I love how festive it looks.
This does not even have to hang over a dining table.  What about a front entry hall table or even  in the kitchen?  Lots of possibilities!
Hope you are inspired to add some sparkle over your table too!

I will be back this week for some more Christmas inspiration!

November 24, 2011

I am so Thankful for YOU!


(feel free to grab this image and have fun)


November 21, 2011

Thanksgiving Fortune Cookie Favors

I am going to take a little break from Christmasy fun to share these Thanksgiving Fortune Cookie Favors. Courtney, one of my sponsors, asked me to create some Thanksgiving favors for her Thirty-One consultants.  I remembered Martha Stewart's fun little fortune cookies she made for Valentine's Day and thought they would make a great little Thanksgiving note to send along with a little takeout box.
Using card stock and some Fall graphics, I typed out the message "I'm So 'Fortunate' To Know You" and used that as the little fortune inside.
1.  To make them, I cut out 4 inch circles out of brown felt.  I cut floral wire slightly shorter then 4 inches and glued it to the center of the circle with brown satin ribbon glued on top.
2. After they dried I laid my fortune across the center face down.
3.  I pulled two sides of the circle up so that the tops meet...
4.  Using my two thumbs in the center, I bent the 1/2 circle in half again to form the fortune cookie shape.
 
I used raffia as a filler inside the takeout boxes and placed the fortune cookies on top.
Each box was tied off with a little, orange ribbon bow.
I added a 2 inch round label with a Turkey and a little thank you note from Courtney.  These circle labels from Avery are awesome and there is so much potential with them.  The turkey template is actually available on their site and I was able to edit it and customize the message.  So fabulous!
I got them all shipped out last week and I personally think it would be such a sweet treat to get a small little box like this in the mail. I mean, who does not like mail??

-I like this idea so much especially for other occasions.  How about having slips of paper for the whole family to write what they are thankful for and then putting them in little fortune cookies  to open on Thanksgiving Day and read them around the table? You could plan ahead and ask family members to make theirs ahead of time. (A great idea for next year) :)

-Great favors or place cards for around the table too!

-Or what about using these for a fun little scavenger hunt in the little boxes?  Perfect for a party, maybe even Christmas morning as clues to find hidden goodies, and of course Valentine's Day.

-How about a way to tell someone you love how special they are?  A great "card" to send to someone far way like a college student or a loved one who just moved to a new place.

Hope you like this fun Thanksgiving idea and it's still packaging so it counts!
Thanksgiving Hugs & Blessings
I am so THANKFUL for each one of YOU!

November 17, 2011

Wreath Chandelier and Ball Garland


Hey Friends!  
Come see me over at Under the Table and Dreaming for a fun Handmade Holidays series where I share the tutorial to make this Wreath Chandelier and the little Ball Garland underneath. There are some pretty incredible Christmas posts to get your holiday inspiration on! Just click the button and you are there!
UndertheTableandDreaming

November 16, 2011

DIY Fabric and Paper Twist Ties

Just a quick tutorial to share how to make festive twist ties. The possibilities are endless with this packaging DIY.  I love the idea of custom twistie ties...you can customize them to your packaging.  These cuties are perfect for food gifts, sweet little favors, or tiny stocking stuffers.
I  actually experimented with all of these and I ended up liking the fabric and paper the best.  The washi tape works well too but if you twist these TOO much the paper can rip.  So if you want to use paper, use more then two layers and make sure your twist tie is not too thick. I was not a fan of the wrapping paper. It was too thin. Grosgrain ribbon was really hard to glue together but the eyelet ribbon above worked great. But my ultimate go to material for this is definitely:  Fabric scraps. But try different things out and see how it works for you and school me on your mad tricks and tips. :)
Fabric scraps, scrapbook paper/cardstock, ribbon, washi or paper tape
Fabric and/or craft glue
scissors
paddle wire  (or other kind of floral wire)

The process is pretty simple.  Cut out strips to desired length, cut some paddle wire and fold in half (if desired), line the fabric with glue and fold over.  You could also lay an additional layer of fabric on the top but be sure you are thorough with sealing it closed with glue.

With washi tape I just folded it over and it stuck together.
Did that even require mentioning?
And of course with paper, I used craft glue but a very thin layer to seal it closed.  I found if I made it too gooey, the paper would soften and tear.
I decided to wrap these cute coasters and use a coordinating twist tie. I got on the bandwagon of these fun tile coasters made with mod podge and scrapbook paper and seriously...the easiest craft on the planet.  And such an awesome result.  The ceramic tiles cost me 16¢ at Home Depot and I used paper I had on hand. 
I wrapped them up and used a matching twist tie. Now I have a cute, coordinating package.

And sorry to be so blog absent lately.  I have 2 more deadlines by Thanksgiving to meet and I am rushing to get them done.  I will fit a few more goodies in through Thanksgiving so I hope and pray you are up on your blog reading! 

I will be...we literally have NO PLANS FOR THANKSGIVING!  Ours kind of changed last minute. One of you can invite me over and I will bring a yummy dessert.  Maybe an apple cream cheese tart from Martha that I have made for YEARS.  It is truly a blissful caloric experience.

Oh and if you have flyer miles for a family of four that would help too.
And clothes for cold winter if you live where it cold.
And maybe a lesson on etiquette since I am asking myself to your Thanksgiving.
I'm done now.

Happy Packaging!


This post brought to you by:

November 10, 2011

Pom Pom + Washi Tape Gift Tags

So my preoccupation with all things yarn continues.  And as most of you probably already know...making a pom pom can be rather addicting.  They are so fun, so colorful, and I thought to myself...something this fun should be on a stick. Seriously, aren't things cuter on a stick?
So that is just what I did.  
After gluing them on lollipop sticks I added some washi tape for a sweet little message.
{Oh and I have already made several sets of these for my soon to happen shop!}
I also decided that making little pockets on a gift would crank up the cuteness factor.  
To make the pockets I used leftover paint chips.
 I used washi tape and double sided tape to secure the pockets.
 This one I just folded over and taped the edges but left a little space by the fold for the stick to slide into.
So fun!
 But of course my favorite is with a little bit of simplicity.
Just taping it to the gift with some extra washi tape.
This makes me happy. :)

Would any of you be willing to purchase gift tags like these? 
(I'm curious) :)
I know I would which is why I made them.  And I really don't mind sharing them with you.
It's more fun to share.
Right?
Visit thecsiproject.com