Image Map
Showing posts with label holiday diy projects. Show all posts

January 24, 2014

Mini Love Notes on a String

Hey friends. 
(she says with her tail tucked between her legs)
Is there a way to blog and have a life?  I just need to know.  I am constantly lamenting this to you yet I have found no viable solution that will enable me to craft and blog while meeting the needs of my family.  Who comes unequivocally first.
But this space gives me such joy...such satisfaction using gifts that only a creative God could give.  I love using my hands to create things yet I see how life is literally fast forwarding and I miss it when I am staring at a bright glowing screen that draws me in and then traps me there until I can shake myself out of it.  I know there are people who can do this...this balance thing.  But for me....someone gets the short end of the stick and it s often at the cost of someone I love.

November 30, 2013

Fast and Simple Photo Advent Calendar

OK.  So I know it is the last day of November.  I am getting this in by the skin of my teeth because I am literally creating an advent calendar at the last minute. GAH! But I figured some of you are still in a turkey fog (like me) and need a quick last minute advent idea to kick off December tomorrow (again, like me). And technically...you have all day tomorrow too. See?  I enable the procrastination further. That's a true DIY friend.
Anyway.  Here is what you need to get...

25 Kraft Paper envelopes
printable number tags (I got mine here)
black and white photos from past family Christmases
clips and /or twine for hanging
washi tape or glue stick to attach numbers

November 22, 2013

Advent Calendar Kit (In a suitcase)

Hey there friends!  Just wanted to give you a heads up that I am over at I Heart Nap Time today with a quick and easy idea to make an Advent Calendar Kit to give as a gift.  It's a perfect idea for a hostess gift on Thanksgiving.  I knew I couldn't post it here for another few weeks so I wanted to be sure you saw it before December 1st.  So head on over there and let me know what you think!
xo, Jessica

November 21, 2013

Yarn Tassel Christmas Trees

Happy Holidays my awesome friends! Yep...It's official.  The Christmas boxes are down and ready to decorate for this weekend.  I am all in...Christmas is HERE.
So clearly...you will see it looking like Christmas around here for awhile.  
I am giddy with excitement. :)

I absolutely love how many variations of Christmas trees there are during the holidays.  And I have this complete love with working with yarn as many of you know.  So I came up with these pretty yarn trees that look fabulous because instead of wrapping them with the yarn, I used yarn tassels to create the look of layers of branches.  I love them so much!

November 14, 2013

Build an Ice Cream Snowman From A Jar


Hey Y'all! Did you catch the first half of  mason jar crafts yesterday by some incredible bloggers? Well today we have the second half of us revealing our projects. I decided to do a fun jar for kids to make a "Build An Ice Cream Snowman Kit."  How fun is that?

October 15, 2013

Jack-O-Lantern Pinata


Hey pretty people.  Not sure if you caught this post over at Eighteen25 for their awesome September Spooktacular.  But my project was this adorable Jack-o-lantern Pinata.

And guess what? I have never made one before.  I have done paper mache and I figured a balloon would work but the rest was me winging it.  And I was surprised to find out that it's really easy!

Here's how I did it...trust me....

October 7, 2013

Fall Leaf Pie Picks


It's Fall Y'all!
These very words are actually written on my chalkboard above the fireplace.  You may ask why this is necessary since this should be obvious...but not to us Floridians melting in the "Fall" humid air.  Upper 80's ain't no Fall, you feel me?  So this Autumn loving girl "fall's up her house" with leaves, pumpkins and orangey goodness along with the actual message that IT IS INDEED FALL. This is to make up for the summer weather that feels like a guest who won't leave.
Ah and speaking of leaves...

October 8, 2012

Yarn Monster Cupcake Picks

In case some of you missed the ever popular Spooktacular over with the fabulous Eighteen25 girls, here was my project for this year...the cutest Yarn Monster Cupcake Picks I ever did see!

They are not hard to make and you only need a few supplies you probably already have in your crafty stash.

June 26, 2012

Simple 4th of July Party Cups


Hey sweet friends!
Here's a quick and easy DIY for the 4th or any other party.
I am all for some pretty mason jars or glass bottles with pretty striped straws.  But if you have a big family reunion or a large party you are going to need something more practical.
Why not make custom cups with some fabric or paper?
 Take some clear plastic cups and cut out fabric or paper circles and place your glue "pretty side up" with a bit of mod podge (it dries clear). Fast, easy, colorful!
Mine are both fabric and paper.  I just traced the bottom of the cup but if you are using paper, you can use a circle punch too.
So easy and makes for a little custom flair to your party!

June 20, 2012

Painted Sailor Stripe Napkins Tutorial

I need to start off by saying that this year has marked the year of my obsession with stripes.  I am not sure why I love them as much as I do but anything remotely nautical or preppy has me over the moon in love.  So I have been dreaming of doing a Nautical 4th of July series for this year.  
And I am kicking it off today. Hooray!
I really wanted to use striped napkins this year but could not find any.  And so they kind of turned into an unexpected DIY project.  I could not find any fabric anywhere with the stripes I wanted and the ones I found retailed at $14 each.  Gah! So I figured a little fabric paint and inexpensive white napkins would do the trick. So a tutorial was born!
What you need: White napkins, red and blue fabric paint, masking tape (or painters tape), paint brush, number stencils, cardboard or poster board.

1. Iron your napkin and lay it flat on top of cardboard or poster board. 
2. Carefully place one strip of tape the length of the top of the napkin.  Do the same thing right underneath it with another line of tape.
3.  I wanted the first stripe to be painted red so I removed the top strip of tape and placed it directly under the second one. Then I placed another strip of tape underneath that and removed the one above it again.
This is how you create your stripes all the way down. 
It also helps that the tape stabilizes the napkin onto your poster board.
 Now start painting the exposed white lines your red color.  Once dry, peel your tape strip to reveal your fun, striped napkin! 
My goal was to make the napkins look like a sailboat sail so I stenciled 0704 (July 4th) onto each corner of the napkin with a midnight blue color.
They ended up really cute!  Or like a preppy prisoners uniform.  Awesome! :)
The monkey fist knots are not really the best knots I could have done. They are supposed to be tighter and much more ball like. I just learned how to make them (my husband knew how and after researching for days I finally asked him if he knew how to make one and he said YES!  Who knew??) I am still practicing and getting better at it and it is a good idea to put a styrofoam ball inside one to help shape it into a ball.  But I figured these still look super cute and nautical like.  Right?  RIGHT???!!!

A photo tutorial would have been close to impossible so here's a great link at animated knots for making a monkey's fist knot with great step by step photos.

I have more ideas to share with you over the next few weeks until July 4th.  
Stay tuned my beautiful friends!
Hugs!

January 16, 2012

DIY Arrow Valentines

Did you all think I forgot you? Could never happen...you are all so dear to me. But I have been trying to let this broken arm heal and it has made me a bit restless. I actually walked around the block the other day and just basked in the glorious solidarity of it. Meaning...I was alone!! And my girls became dreadfully sick. I truly wish you could see me propelling my one armed self out of bed at all hours of the night. My husband yells at me to lay down but those are my babies...broken arm or not I have to take care of them. :)

So I got in some crafting. I almost did not post these. Taking photos was totally challenging and one arm crafting is just plain hilarious! But then I figured with all the flaws, it might impress some of you that I did these one handed. Well, one handed with some right handed holding of objects. So take these with a grain of salt and hopefully you can at least come away a wee bit inspired. 
These are made with wood dowels painted white. I glued fabric, felt, and lace arrow heads and "feathers" while wrapping the middles with odds and ends like pieces of measuring tape, washi tape, yarn, and ribbon. I love the look of the random numbers from the measuring tape. Really fun.
I attached these painted wooden tags tied on with bakers twine. From left to right the hearts are made from red ticking, pink yarn, red felt, and white lace.
A message is easily written on the back to your special Valentine. These would make great gift embellishments or even use as clues for a scavenger hunt. Leave them around the house attached to little treats for your spouse or kids. They were a ton of fun to make and I bet more so with two hands!
 I have more fun ideas coming...slowly. But they will come. :)


I am also dreadfully notorious for sharing big news here on the blog and then show up with a craft and never mention anything else. So here is the latest on my arm...I have an appointment Thursday and I am praying I can be cleared to DRIVE! I am pain free and can move a lot better but the arm is atrophied so I am working on that. I do not have a true cast. Just a splint and ace bandage that I can take off to shower and work on moving my arm. I am assuming some PT is in my near future.

We have had neighbors and friends blessing our family with meals, driving Cati home from school, and just loving our family up. I am humbled by our friends and church family.

But the reality of it all set in this week when I found out from a neighbor that the paramedics said people typically don't survive a fall like that. Then yesterday my husband was up in the attic and I literally started crying in a full fledged panic. Those who know me in real life know this is not really me. I guess seeing the ceiling move and buckle as my husband walked around that hole FREAKED ME OUT!


I'll catch up with you soon friends. Hugs to each of you!

December 28, 2011

Simple New Years Horn Favor

Well hey there sweet friends!  

I am hoping you had an amazing Christmas and enjoyed every memory making moment.  Ours was absolutely lovely until sickness fell over all of us. I have completely lost my voice! But I still have my blog voice so I still can write!  Woo Hoo!

I am on a creative hiatus at the moment. To be honest, I am enjoying just being a mom and a wife. Keeping house.  Photographing the girls instead of pretty things (though they are 2 of the prettiest things I have ever seen ♥).

In the meantime, since I am contracted each holiday to make cute favors, I thought I would share another one I did for New Years.
I ordered a bulk amount of silver party horns and decided to make a little mini subway art styled card to attach to each one with some pink ribbon. For those I used Avery's printable post cards.  I'm not even sure I did the subway art correctly...I kind of crammed some phrases together until I liked it. :) But it turned out cute so that's all that matters.
I have to send all these favors all over the country so obviously they need to be mailed. I am always challenged to come up with a cost effective way to make and ship these favorss. To avoid being crushed, I filled the inside with filler. In case you like this idea to send to people, I included what I did.

1. I cut strips of tissue paper and stuffed them all the way in to the bottom.
2. They were filled about 3/4 way with tissue paper
3. The ends are pink crinkle filler paper for a little festive look.
4. Using a hole punch, i made two holes at the top for the ribbon.
5. I attached the card to the horn with a little bow.
So simple and a super fun way to wish a happy new year.  Or even a fun birthday or New Years party invitation. They also would make great New Year party favors too (shown in top photo) as the countdown to midnight approaches.  

Grab it, print it, use it!

Oh, and soon I will be taking down my bloggy Christmas decorations and going back to normal.  
It feels like it all went by so fast! 
Hopefully the New year will bring more fun ideas and tutorials to share with you.
And I may be adding a linky party to the crafty sea of linky parties!
What do you think?

Hugs!

November 29, 2011

Our Advent Calendar ♥

You know, there is something to be said for creative inspiration born of necessity. And I have wanted to make an advent calendar but I was unsure how or where to put it.  But my criteria was to make it, find a place for it, and use what I have but still try to make an impact.
So this is what I came up with. I love that it ended up looking like diorama but instead of a shoe box...I use an entire bookcase. To be more specific, I used a Billy Bookcase from IKEA. And the fact that I use the word "DIORAMA" further proves the geek girl that I am. At first,  I felt a little crazy starting this project but now...
I am IN COMPLETE LOVE WITH IT!
Each numbered box is a take out box leftover from my Fortune Cookie Thanksgiving Favors.
To decorate the shelves I basically "shopped my house."  I chose a red and white theme as my only criteria and just kind of threw things together from all over the house to make a sort of "scene" on each shelf to create the diorama look for the advent calendar.

The boxes contain an assortment of Christmas goodies like little chocolates, ornaments, stickers, or activities which I coordinated with my calendar.  Those activities could be baking cookies, doing a Christmas craft, or our family tradition of getting in our pj's, and driving in our car to look at Christmas lights while drinking hot chocolate and eating popcorn.  The girls literally talk about that one all year long. :o)
Within each box is also a little paper circle with an attribute of Jesus with a coordinating verse to read after we open each one. I got that amazing idea from  Milk and Cookies and you can find a printable included with it which is what I used inside my boxes. I am really excited to do this with the girls!
You probably recognize some things I have done on the blog already this season.  It gets kind of challenging incorporating a red and white theme so I literally pulled things out of nowhere if it fit the color scheme. Thread, buttons, doilies, little pots, yarn, etc.

Those little snowflakes back there are popped in a random bottle with sugar.
I am all for an "anything goes" mentality with free decor. :)
 BOX #17 DOWN!  BOX #17 DOWN!!!!!!
Whew.  Box #17 made it back up. ;)
Some takeout boxes and ornaments bravely lost their lives during this project.
I think I love the randomness of it best of all. Like using ordinary objects such as spools of twine or a mitten gift card holder to make the color scheme work.
 I'm also rather smitten with how some boxes are hung high, attached to the back of the bookcase or elevated by a candlestick or something.  The varying heights make it look interesting and fun although I think I should have backed the bookcase with a red fabric or wrapping paper or something. It looks too washed out up close but as a whole I do think it looks very pretty.  It is simple and fresh with the red and white.
I was going to do a separate post on these white trees but I wondered if y'all might be "treed" out by now.  But if you are interested, I used felt, yarn, and paper flowers for those and used straight pins for all of them so I could reuse the cones at the end of the season.
 Oooh...the final box.  Are you supposed to do Christmas Day on an advent?  
I see it both ways so I just went for it.
Are any of you weird like me and can actually SPARE a bookshelf for a project like this? I think it is a fun idea but I am sure I will do something new and different next year. And as we use each box, I will just decorate each shelf until we are done.  Yippee!  I get to keep decorating a little each week!
Merry, Merry & Fa La La 

June 14, 2011

Father's Day T-Shirts

 
I had no idea what I was going to do for Father's Day this year.  Not for all the dad's in my life or for my husband. No clue. So when inspiration struck, I was so glad it was not too scary, could be done in a day, and best of all?  The girls could help.

June 10, 2011

A Little Foodie Fun for the Fourth!

This post needs little introduction. 
I just came up with fun food ideas and treats with a 4th of July theme.
I also share some how to's and maybe some funny mishaps along the way.
Enjoy! 


Berry Sweet Ice Cubes
You need an ice cube tray, blueberries, and strawberries cut into small pieces.
Just plop those berries in.  
(I used about 2 blueberries and 3-4 small pieces of strawberries)
When you are done...pop them in the freezer until set.

 All set!

Now pop them in a tall glass of lemonade.
Perfection.

Berry Kabobs with Yogurt Dipping Cups
Fill a small, single serve cup with vanilla yogurt.
Add blueberries, strawberries (maybe even raspberries and blackberries) on a 4 inch skewer.
 Oooh...add a some mint leaves too!
(I bet some granola for some crunch would be amazing too)
You now have some adorable red, white and blue (and a little green) single serve parfaits.

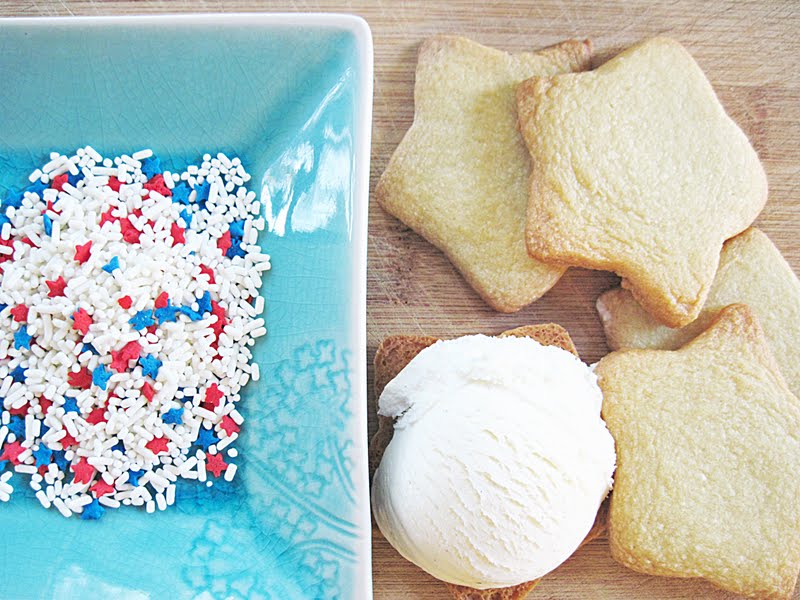
Star Cookie Ice Cream Sandwiches
 Bake some sugar cookies (or your favorite cookies) and cut them into star shapes.
 Pour some happy Red, White, and Blue Sprinkles on a plate!
 Scoop some ice cream on a cookie.

Smoosh another cookie on top to make a sandwich.
Dip it in the sprinkles.
Yummy 4th of July cookie sandwiches.
 Ice cream and cookies. Produces happy and somewhat hyper children. :)

 Flag Cookies On a Stick
 But these were so cute and since I did them with the girls I wanted to share.
Even though I did every bit of the icing and could totally lie to you and tell you they did it.
I try but I simply have zero skills in the cookie, cake, and cupcake decorating department.
I embrace this truth with humility.
I actually have a flag cookie cutter but I wanted mine on an actual stick so I just hand cut the flags and folded the end over a lollipop stick.
I just always make my cookies too thick so they end up looking like square pancakes.
Here is me waving my puffy flag.
 I am convinced some of you can do better and I hope if you make your own cookie flags, you will share your genius with me. :)

 Mini Ice Cream Stars
Now this one is not for the faint of heart.  I must say this little idea brewing in my head was harder to carry out in real life.  I should have kept it safely there in my head.  I wanted to make little mini ice cream cakes out of star cookie cutters.  I should have known cookie cutters work best with...you know...cookies.
I bought some ice cream and um...ate some before attempting this little food feat.
Have more restraint then me.
I tore the carton off around the ice cream...
Which left me with a vanilla ice cream block.
I then sliced it like bread  in order to use the cookie cutters to make the shapes.
Um, ya'll?  Ice cream melts.
And I mean fast.  If I could have vlogged this experience for you, I would have.  It would have been entertaining...I am sure of it.
As I hyperventilated, I started cutting out the stars with my cookie cutters.
And putting them on a cookie sheet like they were hot potatoes.
And this is when it got interesting.
So I started going in warp speed trying to get a bunch of stars on my cookies sheet and it was just not working. It was melting so fast! So I decided to throw EVERYTHING in the freezer and crank up the temp to the coldest setting.  I put the cutters, my knife, everything in the freezer and then tried again.
 Most stressful dessert I have ever prepared.
I do NOT recommend it.
 But I thought you would enjoy my attempt at creativity. :)


Well that concludes my 4th of July Idea Parade!  
This was so much fun and I hope you came away with some ideas for the fourth and ideas for the Summer.
I like that a lot of these are fun for both us adults and for the kids.
Did you like it?

Thank you for your comments, sweet encouragement and friendship!
You are in my heart!

XOXO!

Linking to:
Tatertots and Jello
Show and Tell Saturdays:  Be Different, Act Normal
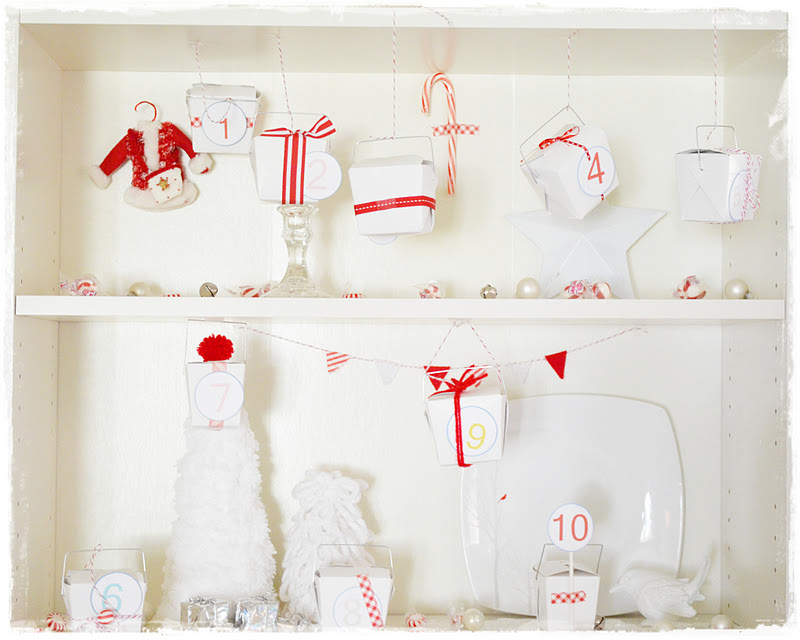