Image Map

April 29, 2011

Bird Themed Favors and Placecards

Oh friends.  If you only knew the drama that has played out over these favors and place cards.  I seriously had no idea what I was going to do and stressed over them as if my life depended upon it.

Yes, over people's names and a little thank you goodies. To know me in real life, is to experience the intense anal retentiveness that is my reality.

So this post will show you what I came up with and also what I TRIED to do and what did not work out.

It'll be fun.
Once upon a time there were these little $1 bird houses. 
You were such a quandary to me in how I was going to use you yet your bird themed essence and cuteness-on-the-cheap made me purchase you.

And then paint you. The end.

Now what?
So I racked my brain thinking maybe I would make these the place cards but that just did not sit right.  Not what I was going for.  Then the Hubs suggested cute little bird magnets. Brilliant. It would be quick and cost me zero dollars.
So I made these which my Ella called little bird pillows.  Love her.
When she saw they had magnets on them she was ecstatic.
If you look at them for long periods of time, you will begin to wonder if they are actually tadpoles coming into their froggy-ness.
 So I attached each bird to a house.  Just a little scotch tape worked.
And wrote a little thank you note on each roof.
It's cutesy and fun.  I like it.
Now for the place card idea that FAILED...
I came up with the idea of using a bird bath for each place card.
But what could I make into a bird bath? 
So I got to work experimenting.  I grabbed a candlestick, a pink ramekin, and a little dish.  I figured if one of them worked, I would glue it to the top and spray paint the whole thing.
Nope.  Looks too much like a wine glass and just did not look right.
 Neither did this one.
 I kept staring at my candle stick and then wondered...what if I flip it over???
Yes! 
Perfect!  It looks just like a little bird bath!! 
What if I paint the inside and add a little bird place card!  ADORABLE!  
I bought these at the dollar tree and I knew I could get a bunch more!  Yay me!
Um, no. My sweet husband was on the hunt and went to every dollar tree near us.  None.

Back to the drawing board.  
But I had to share in case one you are lucky to find them at yours and can tuck this idea away.

So here is what I did.  The backyard was becoming the hottest spot for this tablescape, so I gave that  a whirl again.  And I found some little branches.

And dry brushed painted them with a little light grey paint. 
The color is called Old Faithful.  Isn't that a great name?
And I added some paper punch out leaves.
They match perfectly and each side has a different pattern. Love, love, love how they turned out!
The actual place cards I agonized over.  I finally went with simple using a a pink cardstock with a pretty sheen on it, a circle punch, a pretty font, and some pale green ribbon. I tried birds (but I felt we were getting birded out), bracket labels...nothing looked good.  Turns out...simple works best. :)
 Another idea is to use a place card with a bird clipped to the branch.  I saw a set of 6 white birds at Joann's that would be really cute. 
 Tomorrow I will be setting it all up and then tomorrow night is the big night!!!
I will do my best to take photos but I may not get to show them to you until Monday.

Thank you so much for coming along with me on all these tutorials to a beautiful Spring Tablescape!
I hope you liked it and I can't wait for you to see the whole table put together. I will be adding some extra stuff you have not seen yet to give it the final touches and to match our theme!

I am so excited!

April 28, 2011

No Sew Napkin Wraps


 I am fearing that this post will be anti-climatic after already revealing the centerpiece.
So please comment just to be nice, OK? You are the BEST!
The idea for napkin wraps came to me after I realized I did not have any pretty napkin rings. Or even napkins to match.  I bought this pink coordinating fabric but still needed napkins.

You should have seen my high and low search for just the right napkins.  Drove myself crazy.  Drove my family crazy.  But then Marshall's had these adorable teapot ones and I had to have them.
Even if they don't match since they will be rolled up or in someone's lap. 

You probably don't not know this but I have this thing for teapots.  I collect them.  
So when I spotted this precious little embroidered teapot, on the perfectly colored napkin, that cost $3.50 for four...I was sold. It even has a bird on it.  It looks prehistoric but whatever.
So to make these, you need fusible bonding tape and some velcro dots .
Iron-on adhesive tape saves you from sewing.  Amen.
First, I rolled up my napkin to figure out the length I would need to wrap around a rolled napkin.
 I needed about 6 inches around for it to be tight when I closed the wrap.
Now I tried measuring this out to help you if you wanted to make these but I realized this is pretty much personal preference.  I made these to fit a tightly rolled napkin but they might not work if you wanted the napkin another way.
Then I used a piece of paper to figure out how wide I wanted it to be.  
This happened to be too much so I just folded it to a width I liked.
I ended up cutting 5 x 8 inch pieces of material to make the size I wanted.
Definitely follow the directions on the fusible bonding tape.  But here's what you basically do...
Fold the edges over twice and iron the crease.

Put the fusible tape (paper side up) on the crease and press with an iron for 2 seconds on medium heat.  
LET IT COOL!  
Then take the paper strips off revealing a clear adhesive strip.
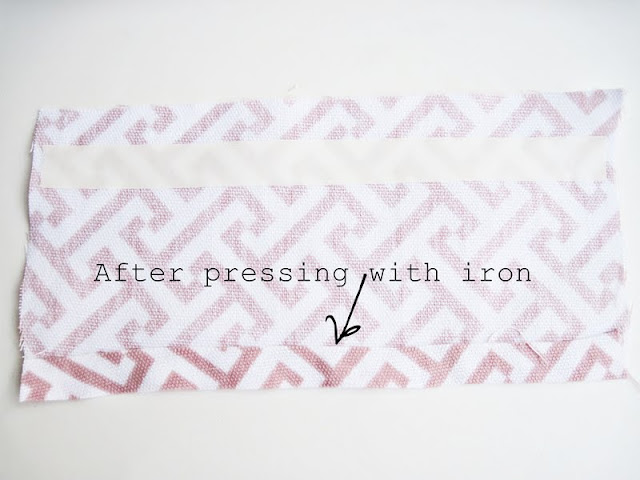
Fold the edge over and press with iron for about 8 seconds. 
It should look like this.  Do this on the long sides first then the short sides.
Now we have finished edges with no sewing involved.
To add the velcro dots, I placed the fuzzy sided ones on the edge of one shorter side.  I used hot glue to reinforce them since the package said not recommended with fabric
Note to self:  Read labels before purchasing.
Then I wrapped it around a rolled napkin and aligned the scratchy dots with the fuzzy ones.
Now you can just roll and wrap.
It would have sounded so much cooler if I could have said wrap and roll. Dang.
I just love this color combination together.
Here it is coordinating with the fabric chargers I made.
It would be so pretty to wrap ribbon around this with a little place card.
Add buttons or snaps instead of velcro.
Even decorative buttons on the outside on the seam would be pretty too.

And if it is not already obvious, this method works for making custom napkins too!

Tomorrow is the last day where I will show you favors and place cards before I set it all up Saturday morning.  I have changed my mind 172 times so I wish I could give you a teaser but I still don't know.

See you tomorrow!
Hugs my sweet friends!

April 27, 2011

Branch and Nest Centerpiece

Isn't this the perfect shape branch for a centerpiece?  I am hugging myself with joy...I am that excited.
Yep.  Over this branch.
I wanted to create a nest and branch centerpiece to compliment the "We are Family" theme for the gala. Yet I really had no idea how it would look until I started.  But I knew I needed JUST the right branch.

Picture this...I trudge out to the backyard hoping the little stick pile my husband created cleaning out the yard will surface the ideal branch since it is kind of the MAIN ATTRACTION. And all I am finding are long sticks with no branches.  As I begin to pray to find just the perfect one, I glance down and THERE IT IS!  The hallelujah chorus commenced above and with the angels, I rejoiced.

Honestly, this centerpiece requires more than one post but I crammed it all into this one, big, happy one.  So get a snack and come back to read. :)

Back to my divinely found branch...
So I take this bad boy, check for insect life that will reduce my excitement significantly and begin to dry brush it with a light grey paint.
Now the branch is lightened up a bit and not too, too rustic.
I decided I was going to make a nest from Spanish moss and use river rocks as my eggs.  I tried to find the flattest rocks that I could.  I bought those big ones in the background at Wal-Mart and they were way big and heavy.  Since the backyard proved fruitful once before,  I tried again...and I found smaller rocks (foreground) that worked!
I apparently have the BEST stuff in my backyard.
I painted  my rock/eggs to match the look of the table.  Alone they look kind of Easter like but I still liked it.  They are sorta distressed to give an appearance of speckled eggs.
 Next, I used my Target dollar section alphabet stamp set that is probably my most favorite ever dollar find.  Ever! 
And stamped our names on each rock. 
 How fun is this?

For the nest, I just kind of shaped it to look nest-like and used spray adhesive to keep the mess to a minimum so it would all stick together.  
It helped a lot but I am going to have to accept there may be some fall out. 
When I do the set up, I am bringing one of those lint rollers.
The nest was also a little dark for the look I was going for so I spray painted it white as well. 
Not completely but enough.
 I also added the slightest bit of sparkle with some really fine glitter.  I was not looking for anything obvious to bling the nest out.  I just wanted something subtle so that when candles are lit, it will sparkle a little.
 Can you see it a little here?  The sun kept hiding from me but I do detect some sparkles. :)
 Don't the eggs look so cute in there?
They totally rock. ;)
My husband also helped me again when I asked him to carve our last name into the branch.
(now you can friend me on FB...but I am never on there.)

Then I cut some fabric leaves that will compliment the fabric chargers and finish off the branch.
The following photos are blurry because my camera was on the wrong setting. Sorry!
I made the leaves by folding the fabric in half and then cutting it out, and gluing the leaf pieces together.
This way, the right side of the fabric is on both sides.
It looks like a green, flowery mustache, doesn't it?
I needed to pinch the bottom and glue to give the fabric some stability using a glue gun.
And clearly some paint just prior to snapping this pic.
 Then I simply glued the pinched leaves on the branches.
 
 
Our Family Nest.

I am pretty excited about how this turned out. And I love the idea of doing this for so many things.
How about a wedding with the couple's names in the nest?  How cute would that be?
Or a baby shower with pink or blue eggs.
Oh, or  a way to announce a baby gender?
My mind is whirling with ideas!

We are almost there to the completed tablescape!
What do you think so far? I would love to hear from you!

Until tomorrow sweet friends...

linking to this week: