TIP #1: Chalkboard Pots
Hi friends! I am back doing my own Two Tips for today. I am excited too because I am doing kind of an entertaining theme which has been on my mind for weeks now. Last Saturday was supposed to be an all girl's lunch with some of my sweetest, most wonderful friends but I had to cancel due to that wretched illness which had befallen us. I had been planning this lunch for over a month and all of us were set to leave the kiddies at home and just enjoy being together. The good thing is, we will reschedule. But with us moving soon (nope, no new news yet) it is kind of up in the air.
So. In light of that, I have been making and wanting to give little things to spoil my girlfriends and make the lunch special. I played around with a a gazillion ideas and here is one of them.
I wanted to do favors and I thought little potted herbs or flowers would be great to give since it is the beginning of spring. So how cute do those pots look with chalkboard paint (I used the spray paint) with the label written on there in pink chalk?
How much cuter would they make as place cards? Fun, fun! Full effect in next tip....
TIP #2: Unconventional Napkin Rings
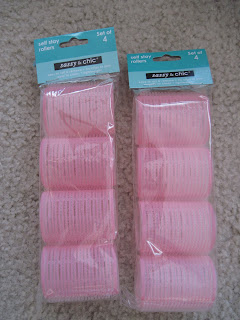
Yes. Hair rollers. Isn't that a hoot? :o)
Seriously, what a perfect thing to make into napkin rings. They are light. They are round. They are cheap. Ahhh. Crafty bliss. And I have been playing around with burlap lately wanting to do a gazillion crafts with it. So here is a teeny and brief tute on how to make these:
Materials:
Burlap (or other fabric or material)
Hair rollers (the self stay ones)
Glue gun or fabric glue
Ribbon, buttons, or other optional accessories
I placed one roller in the middle of the fabric and kind of eye balled it to be sure about 1 inch of fabric extended to either side of the roller. I then used pinking shears to cut since burlap unravels and frays easily.
Placing the roller in the center I placed a little glue under where my thumb is and began rolling it up. I put glue on the inside of the roller and tucked in the excess in as I rolled. The fun thing is that the roller keep the fabric in place to keep it from sliding. See? Practical too.
I rolled the burlap around twice making sure the pink color could not be seen through the burlap.
As you roll it, glue the inside and work your way around tucking the burlap in on both sides.
Another option after completing this is to line the inside with felt or a pretty fabric. I forgot to take a picture of that.
As you roll it, glue the inside and work your way around tucking the burlap in on both sides.
Another option after completing this is to line the inside with felt or a pretty fabric. I forgot to take a picture of that.
I decided to keep a set of them plain in order to change up my color scheme with ribbon and other embellishments. This one I just wrapped a color coordinating ribbon around it and tied it in a simple knot.
I just love how they turned out!
** Don's forget. You can be a guest blogger on Two Tips Tuesday and share your tips too.
Just contact me with your fabulous ideas!
Happy Tuesday Friends!


aw Jessica i LOVE IT!!
ReplyDeletei have a project in the works that involves that chalk spray!! i love that stuff!!
love the napkin ring idea!!!
ReplyDeleteCould not visualize how those curlers were going to be used---what an awesome idea!!I love both of these tips! You are chock full of the best ideas!
ReplyDeleteJust found your blog - how cute! Hello!?! Curlers!?! ingenious!
ReplyDeleteKim @ http://frostmeblog.blogspot.com
party inspiration
very cute napkin rings. You are very crafty. You are making me want to post my crafty ideas.
ReplyDeleteI love the chalkboard pots with herbs in them! I would LOVE receiving a pot of basil because then I wouldn't have to sneak it from my neighbors garden! She tells me too but I always feel like such a thief! I use it almost everyday in the summer :) Very cute! Both ideas!
ReplyDeleteYou commented above me on Someday Crafts so I had to c'mon over and see your napkin rings made out of curlers. They came out super cute and it was a great idea to keep them plain so you can switch out the ribbon and make them match your theme. I love the burlap, a great way to add texture to your placesetting. It's a very creative project! BTW also love the wreath, disc, and heart foam and silk flower you made.
ReplyDeleteI found your blog on my mother in law's blog: buttsandashes.. :)
ReplyDeleteI just want to say that I find you VERY refreshing, and can't wait to read more! Thank you for your honest approach to Christianity and life in general. I'm lovin' it!
Have I told you that you've made Tuesday into the best day of the week??
ReplyDeleteWhat great ideas love them both shall try em
ReplyDeleteJessica,
ReplyDeleteAWESOME!! So cool you used curlers lol
happy crafting,
Linda
Love the napkin holders! Such a creative idea! I'll definitely have to try that someday!
ReplyDeleteWanted to let you know also, I just added your button to my blog! There's a few little extras in your code that you may want to take out though so it works properly! Before the http of your address there is an extra / and at the end there is an extra />
Hope you're having a good week!
That is a great idea!!! I love using old stuff to make new stuff!
ReplyDeleteJust wanted to let you know that I added this to a roundup on dollar store crafts - not sure when I will post it, though! Thanks! And awesome crafts! The napkin ring is brilliant!
ReplyDeleteThis is so cool. Who would have thought. Hair rollers. Woman, you seriously are crafty.
ReplyDelete