

Tip #1: Two Tier Plate Stand

This was so simple and fun to make. I was inspired by this post from Tatertots and Jello. I was incredibly impressed that this project cost her only $2! And what I loved best is she used a candlestick to make it. Brilliant! So I tucked this idea away in the inspiration board section of my brain. Then I was out shopping and came across these melamine plates. I loved them because they were two different sizes and the smaller ones had the same graphic but only larger. Each plate was $1.99. I knew this was the project to use them for! I am astounded at how fabulous they look after only these simple and easy steps...
 You will need 2 sets of plates, white spray paint, and two candlesticks from the dollar tree.


I used hot glue but Jen at Tatertots and Jello used gorilla glue in her tutorial which I think is a great idea too. I just did not have it and I of course waited until Monday afternoon to work on both tips for this Tuesday.

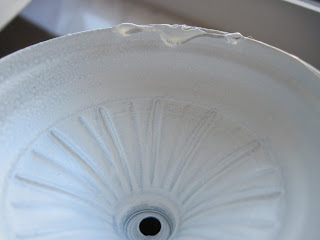 I made sure to coat the edge with hot glue and let the drips fall to the inside. I centered it on the bigger plate for the bottom tier and then centered the smaller plate for the top.


Spray paint the candlesticks with 2-3 coats of spray paint and let dry. Seal if desired.
Do not do this as close to your family van as I did. Praise God it is white.
Do not do this as close to your family van as I did. Praise God it is white.

This is what the candlestick looks like when finished.
I used hot glue but Jen at Tatertots and Jello used gorilla glue in her tutorial which I think is a great idea too. I just did not have it and I of course waited until Monday afternoon to work on both tips for this Tuesday.


That's it!

Sunday, I had an opportunity to walk to the library while the girls napped. My intention was just to browse books and magazines and hang out. I started reading some back issues of Country Living magazine (May 2009) and I came across this awesome tip in their Idea Notebook section.
Turn a potholder into an eyeglasses case!
How smart! And being a 4-eyes since the age of 6 that I am and unable to see the Big E on the chart without them, I was intrigued. I need to take care of my glasses because without them I am LEGALLY BLIND! Seriously.
So I made them two different styles using...

...these pot holders.
STYLE ONE (the above picture) is just the kind you slide in with an opening at the top.

I started by turning the pot holder over to the back lying horizontally.

I first folded in the terry cloth, pocket portion towards the center.

No, I do not use a sewing machine. The last time we got together, we had words, said some things we did not mean, objects may have been thrown across the room. It was not pretty. And that was before I threaded it.
But this project is so easy with or without a sewing machine. (Just looks nicer with one of those mean old things).

Fold the print side up first.

Stitch up the side on the seam of both sides.
I used brown thread because I ran out of the pretty tealish color. Grrrr.

When you are done sewing the sides, fold down the top and it should look like this.

I took the pot holder loop off using a seam ripper.

I carefully cut it off as close as I could to the edge.

To cover it up, I stitched brown felt on the inside edge over to the top.

I then attached a fun green button for flair. :o)
I plan on attaching a Velcro closure but never got the chance because I had a class to get to. Sorry for waiting until the last minute.
The best part about this little clutch case is that you can use it for anything. Throw some make-up in there, coupons, whatever. And shhhhh. Who would know it was a pot holder?
Happy Tuesday Friends!

I am from Russia and in Russia exist opinion American women don't able make things by hand. But after your handsome bag I have changed my opinion!
ReplyDeleteLast minute works for you because these were awesome tips!!!
ReplyDeleteMy sewing machine and I had a fall out, too. And I guess I complained about it loud enough, because I got a new one for Christmas! It's rather loud, but it can sew through just about anything! My bags for the art auction aren't out of place mats, but I'll make one soon and post pics!
Great ideas!
ReplyDeleteOMGEEE I love it!!! great tips!!! Thanks so much for the two tips I look forward to them!!!
ReplyDeleteOh my goodness! I love your two ideas! I am seriously going to stop by the dollar store and target on the way home so I can try these out!! Thank you so much for sharing!
ReplyDeleteI hope you have a beautiful and blessed day!
xoxo,
KA
I love both of your ideas!! I've been seeing these melamine plates but hadn't known what to do with them - NOW I know. And your eyeglass case is brilliant! I linked to it on Craft Gossip Sewing:
ReplyDeletehttp://sewing.craftgossip.com/tutorial-eyeglass-case-from-a-potholder/2010/03/02/
--Anne
wow wow wow!!!! i LOVE these tips!!! I want to grab your two tips tuesday button for all my friend to come visit!!!! I am going to try the stacked plates for my baby's birthday party treat tray!!! you are awesome thanks for sharing!!!
ReplyDeleteSeriously!? These projects are both AMAZING! I shared the link on my craft forum so that my friends can come check it out too, i love these! Great ideas and thank you so much for the tutorials!
ReplyDelete- Miss Imagination
ha! Jessica you are my friendly neighbor down the street with your own, (paid for) pastel cottage. You may have kids in your dream world, but not in mine sistah! since your cottage is paid for you also have the money to come to my shop and buy a Lollibag everyday, oh wait no you sometimes work in my shop for me, so you get one free :) Ok I'm taking this way to seriously, I"m staring at my computer screen, not wanting to snap back to real life..
ReplyDeleteWell look at that! Those are great crafty ideas. Loved the plates:)
ReplyDeleteI HAVE to make that ASAP! Soo cute and it looks very easy! I will link up when I get them finished! :)
ReplyDeleteI was so excited when I saw this post. I have made the cake stands before using vintage plates and vintage glass candlesticks. See, I am crafty and nit just in a sneaky, evil way.
ReplyDeleteBTW....I have been praying for you on your house hunt. Keep me posted!
This is my first tme reading your blog, I found you through Craft Gossip. I really enjoyed it. Not only are you creative but you are very funny too.
ReplyDeleteOh my goodness that is soooo cute! Almost makes me wish I wore glasses! :)
ReplyDeleteBut how do you do it? Coming up with 2 tips every Tuesday? You are officially amazing!!!
Oh & you are very observant about thet capes! My older sister gave both her nephews capes for Christmas & Bo's cousin left his here last time he was over...so there are 2 capes! But the blue one is ours :) Seriously though, if you ever have a little boys birthday party...Cracker Barrel...I think they were only like 12 bucks & you probably can't even make them for that! Bo's cape gets used EVERYDAY :)
Hope you house hunt is going better!
I love the glasses case - what a fab idea! I added this to our link luv roundup today, come by for a peek! http://bit.ly/d8hv9k
ReplyDeletewe also have "featured on luvinthemommyhood" buttons for blogs and if you're interested in sporting one just send an email my way :)
Both are soooooo cute! Amazing!
ReplyDeleteThat is JUST BRILLIANT!!! I LOVE SIMPLE YET what a terrific finish!!! Looks so professional!
ReplyDeleteI featured your awesome plate stand in my "Tutorial Tuesday" post today featuring my favorite DIY projects. Thanks for the awesome tutorial!
ReplyDeletehttp://erraticallyelizabeth.blogspot.com/2011/03/tutorial-tuesdays-home-decor.html
tres joli j aime bises jojo
ReplyDeleteI just recently discovered your Two Tier Plate Stand project as well as your blog via Pinterest. Have you seen any of these two size/same design melamine plates lately? I'd love to make this project but haven't been able to find plates that I like. Thanks for any suggestions!!
ReplyDeleteNot EXACTLY like these but I did a little hunting yesterday for you and I came across some at Target made by Privet House. They have a coral and khaki color scheme and even some Kelly green! They are such fun! Here's a link to some designs but these are not the ones I saw at Target just last night...the ones I saw are cuter! http://www.houzz.com/photos/848256/Privet-House-Melamine-Tableware-contemporary-dinnerware-
DeleteAlso, I find fun ones at Pier 1, Home Goods, and the ones in this post are from Burlington Coat Factory! I was also reading in BHG yesterday and they featured some really pretty plates. Here are links for a set from Crate and Barrel...http://www.crateandbarrel.com/dining-and-entertaining/dinner-plates/marimekko-unikko-green-and-blue-11%22-melamine-plate/s664475 and also zgallerie has a set of chevron ones...http://www.zgallerie.com/p-12010-zig-zag-dinnerware-aquamarine.aspx
Hope you like these ideas!
Here's one more adorable one from pier1...http://www.pier1.com/Catalog/DiningEntertaining/tabid/977/CategoryId/109/ProductId/36600/ProductName/Catalina-Cove-Outdoor-Dinnerware/language/en-US/Default.aspx
Delete:) Now you have me wanting to update mine! Blessings my friend!
Jessica
Why wouldn't you just add the button to the bottom and use the loop as a button hole closure? I think I will try it this way. This is going to make getting old and needing glasses for the first time that much better! Thanks so much for the idea!!
ReplyDeleteWhy wouldn't you just add the button to the bottom and use the loop as a button hole closure? I think I will try it this way. This is going to make getting old and needing glasses for the first time that much better! Thanks so much for the idea!!
ReplyDeletebear grylls messer
ReplyDeleteVisit my weblog ... bear grylls messer