Image Map
Showing posts with label 4th of July. Show all posts

June 24, 2015

The Easiest 4th of July Cupcake Picks...Ever

Aren't these little Star picks just the cutest?
I can't even...

When I started styling my little photo shoot for the Mason Jar Sippers with Darby Smart, I was trying to work with what I had around the house to make something super quick.  I started grabbing red and blue fruit, some red plates, nautical 4th of July napkins, and cupcake wrappers with patriotic colors. But I didn't have anything to decorate the cupcakes.

So I came up with some crazy easy toppers that took 5 minutes to make.
 All you need is some silver floral wire and star stickers. 
That's it.
Cut your floral wire to different lengths and sandwich one end between two star stickers. 
Using different size stars in reds and blues makes it just about perfect.
Boom. You are done.
Don't they look darling??
I'm telling you. This is the easiest diy for your 4th of July party or get together.

June 23, 2015

4th of July Sippers with Darby Smart

For awhile now, I have wanted to update one of my most popular projects which was my Mason Jar Sippy Cups from a few years ago.  I was excited to add some paper straws, modern paper, and put a fun twist on one of the easiest projects I have ever done. I presented it to my friends at Darby Smart and they agreed to make this great project into a kit! 
I could not be more thrilled!!

June 26, 2012

Simple 4th of July Party Cups


Hey sweet friends!
Here's a quick and easy DIY for the 4th or any other party.
I am all for some pretty mason jars or glass bottles with pretty striped straws.  But if you have a big family reunion or a large party you are going to need something more practical.
Why not make custom cups with some fabric or paper?
 Take some clear plastic cups and cut out fabric or paper circles and place your glue "pretty side up" with a bit of mod podge (it dries clear). Fast, easy, colorful!
Mine are both fabric and paper.  I just traced the bottom of the cup but if you are using paper, you can use a circle punch too.
So easy and makes for a little custom flair to your party!

June 20, 2012

Painted Sailor Stripe Napkins Tutorial

I need to start off by saying that this year has marked the year of my obsession with stripes.  I am not sure why I love them as much as I do but anything remotely nautical or preppy has me over the moon in love.  So I have been dreaming of doing a Nautical 4th of July series for this year.  
And I am kicking it off today. Hooray!
I really wanted to use striped napkins this year but could not find any.  And so they kind of turned into an unexpected DIY project.  I could not find any fabric anywhere with the stripes I wanted and the ones I found retailed at $14 each.  Gah! So I figured a little fabric paint and inexpensive white napkins would do the trick. So a tutorial was born!
What you need: White napkins, red and blue fabric paint, masking tape (or painters tape), paint brush, number stencils, cardboard or poster board.

1. Iron your napkin and lay it flat on top of cardboard or poster board. 
2. Carefully place one strip of tape the length of the top of the napkin.  Do the same thing right underneath it with another line of tape.
3.  I wanted the first stripe to be painted red so I removed the top strip of tape and placed it directly under the second one. Then I placed another strip of tape underneath that and removed the one above it again.
This is how you create your stripes all the way down. 
It also helps that the tape stabilizes the napkin onto your poster board.
 Now start painting the exposed white lines your red color.  Once dry, peel your tape strip to reveal your fun, striped napkin! 
My goal was to make the napkins look like a sailboat sail so I stenciled 0704 (July 4th) onto each corner of the napkin with a midnight blue color.
They ended up really cute!  Or like a preppy prisoners uniform.  Awesome! :)
The monkey fist knots are not really the best knots I could have done. They are supposed to be tighter and much more ball like. I just learned how to make them (my husband knew how and after researching for days I finally asked him if he knew how to make one and he said YES!  Who knew??) I am still practicing and getting better at it and it is a good idea to put a styrofoam ball inside one to help shape it into a ball.  But I figured these still look super cute and nautical like.  Right?  RIGHT???!!!

A photo tutorial would have been close to impossible so here's a great link at animated knots for making a monkey's fist knot with great step by step photos.

I have more ideas to share with you over the next few weeks until July 4th.  
Stay tuned my beautiful friends!
Hugs!

June 10, 2011

A Little Foodie Fun for the Fourth!

This post needs little introduction. 
I just came up with fun food ideas and treats with a 4th of July theme.
I also share some how to's and maybe some funny mishaps along the way.
Enjoy! 


Berry Sweet Ice Cubes
You need an ice cube tray, blueberries, and strawberries cut into small pieces.
Just plop those berries in.  
(I used about 2 blueberries and 3-4 small pieces of strawberries)
When you are done...pop them in the freezer until set.

 All set!

Now pop them in a tall glass of lemonade.
Perfection.

Berry Kabobs with Yogurt Dipping Cups
Fill a small, single serve cup with vanilla yogurt.
Add blueberries, strawberries (maybe even raspberries and blackberries) on a 4 inch skewer.
 Oooh...add a some mint leaves too!
(I bet some granola for some crunch would be amazing too)
You now have some adorable red, white and blue (and a little green) single serve parfaits.

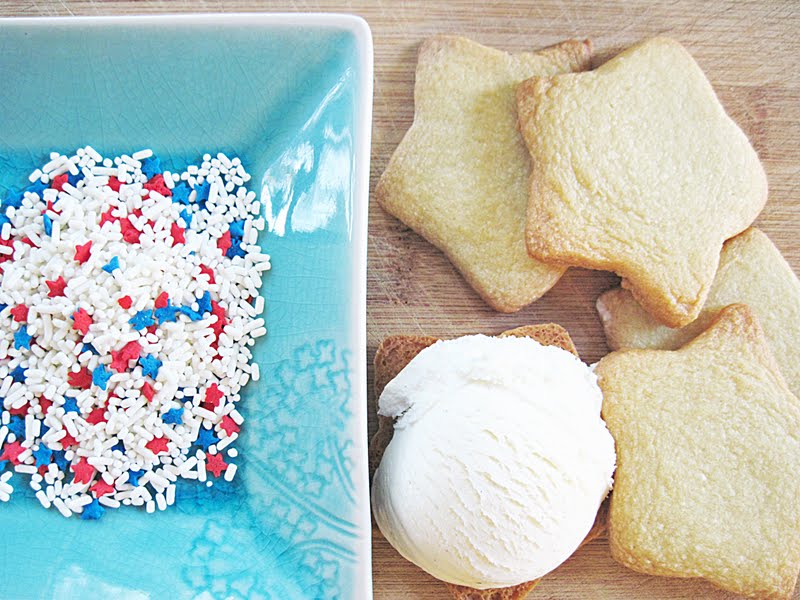
Star Cookie Ice Cream Sandwiches
 Bake some sugar cookies (or your favorite cookies) and cut them into star shapes.
 Pour some happy Red, White, and Blue Sprinkles on a plate!
 Scoop some ice cream on a cookie.

Smoosh another cookie on top to make a sandwich.
Dip it in the sprinkles.
Yummy 4th of July cookie sandwiches.
 Ice cream and cookies. Produces happy and somewhat hyper children. :)

 Flag Cookies On a Stick
 But these were so cute and since I did them with the girls I wanted to share.
Even though I did every bit of the icing and could totally lie to you and tell you they did it.
I try but I simply have zero skills in the cookie, cake, and cupcake decorating department.
I embrace this truth with humility.
I actually have a flag cookie cutter but I wanted mine on an actual stick so I just hand cut the flags and folded the end over a lollipop stick.
I just always make my cookies too thick so they end up looking like square pancakes.
Here is me waving my puffy flag.
 I am convinced some of you can do better and I hope if you make your own cookie flags, you will share your genius with me. :)

 Mini Ice Cream Stars
Now this one is not for the faint of heart.  I must say this little idea brewing in my head was harder to carry out in real life.  I should have kept it safely there in my head.  I wanted to make little mini ice cream cakes out of star cookie cutters.  I should have known cookie cutters work best with...you know...cookies.
I bought some ice cream and um...ate some before attempting this little food feat.
Have more restraint then me.
I tore the carton off around the ice cream...
Which left me with a vanilla ice cream block.
I then sliced it like bread  in order to use the cookie cutters to make the shapes.
Um, ya'll?  Ice cream melts.
And I mean fast.  If I could have vlogged this experience for you, I would have.  It would have been entertaining...I am sure of it.
As I hyperventilated, I started cutting out the stars with my cookie cutters.
And putting them on a cookie sheet like they were hot potatoes.
And this is when it got interesting.
So I started going in warp speed trying to get a bunch of stars on my cookies sheet and it was just not working. It was melting so fast! So I decided to throw EVERYTHING in the freezer and crank up the temp to the coldest setting.  I put the cutters, my knife, everything in the freezer and then tried again.
 Most stressful dessert I have ever prepared.
I do NOT recommend it.
 But I thought you would enjoy my attempt at creativity. :)


Well that concludes my 4th of July Idea Parade!  
This was so much fun and I hope you came away with some ideas for the fourth and ideas for the Summer.
I like that a lot of these are fun for both us adults and for the kids.
Did you like it?

Thank you for your comments, sweet encouragement and friendship!
You are in my heart!

XOXO!

Linking to:
Tatertots and Jello
Show and Tell Saturdays:  Be Different, Act Normal