I know. It probably makes no sense that I take a two week hiatus and then just launch into a post like nothing happened.
I have to tell you I needed that break. I know it sounds crazy but as my girls both had approaching birthdays I was suddenly hit with the finality of MOMENTS. Call it a moment of clarity. That these precious moments can pass without you even noticing and there is no getting them back. I would look into those sweet faces and realize that time is literally warp speeding by me.
So I jumped in and had the best time playing human choo choo train around the house, going swimming, watching the clouds change shape, sitting in a movie theater sharing popcorn and whispers, playing baby dolls, and lots and lots of snuggling. I don't plan on it ending. ♥
My Ella just had her 3rd birthday this past Friday. Which prompted this clarity I was referring to. I am still wrapping my mind around my youngest child being 3. No longer a baby. Lord willing, we will have more babies. Whether biological or adopted...I have no idea. But we want more children. And I have been hit with the fact that mine are just...GROWING. Like all the time. And I can't stop it. But I sure can enjoy the ride.
So. That is what I have been up to. Just enjoying my two girlies and loving my life. But in the meantime...I have also been hard at work preparing for this upcoming picnic party. I don't have tutorials for you but I will share some photos of the things I have made.
Hope you enjoy them!
 Tissue Paper Pom Poms
I plan on hanging them from our big tree in the front yard.
I made a lot. :)
 Fabric Ruffly Balls
These cuties are much smaller and I was also going to hang these from the trees.
But I did not make a lot (a little bit more time consuming) so I may not use them.
But who knows...so I included them for you to get a peek!
 Pretty Paper Garlands
Paper doilies and scalloped garland made from a 2 inch circle punch with each circle folded over ribbon.

 DIY Water Bottle Labels
These were fun. I customized these in power point from a template that I got from another blog awhile back and I can not remember where. I actually only wanted it for the measurements.
When I find it, I will put the link back here on the post.
I am too cheap to buy the waterproof label paper so I just wrapped them in packing tape.
I confess it looks a little ghetto on some of them but...whatever.
$1 Picnic Baskets
I found these at the dollar tree and I plan on serving each FAMILY their picnic dinner in them and labeling them for a personal touch. I initially wanted to serve everyone their picnic in boxes wrapped in twine but my husband convinced me this would have been a stressful prepping situation.
I really think the family baskets will be so cute!
I confess I am itching to spray paint them but I am trying to restrain myself. :)
Printable Labels from one of my favorite
blogs...I will be introducing her to you
VERY soon!
Juggling (Bean Bag) Balls Made from Balloons
I got this idea from
Family Fun. They are made with two 9 inch balloons with the necks cut off and rice inside.
Using a funnel, fill up one balloon with rice, snip the neck. Then take another empty balloon, snip the neck off that one and stretch it over the filled one.
A really quick project!
These favors will be juggling balls for the boys and I think I may add chalk for the girls for hopscotch sets. I really wanted to make fabric bean bags for the girls but I made way too many juggling balls and again...trying to find BALANCE.
And FINALLY...for your entertainment at my total expense...here is the cake Ella and I made for her actual birthday.
I have said it before but...
Mistake 1: Using a cookie icing pen I happened to just find in the pantry. Expiration date unknown.
Mistake 2: Putting lid on cake plate before icing set. Hence letters that look creepy instead of happy.
Mistake 3: Attempting to fix letters with toothpick to regain legibility and royally messing it up even more.
Mistake 4: Not remembering my 3 year old can not read.
That is about it on what I have been up to. The party is this Saturday and I hope upon hope I have the time to photograph it for you. And I am also PRAYING THIS TROPICAL STORM NAMED EMILY (love that name, not the storm) MOVES FAR, FAR, FAR, INTO THE OCEAN AND AWAY FROM FLORIDA so that I don't have to move fifty people into my lovingly quaint but small house.
Or move them into my even smaller laundry room for shelter.
Which fits like two people. (It is the only room without windows)
Eeeeek!
I will have family in town this week so you may not hear from me until next week some time.
Until then my sweet friends...
Hugs to each of you! I have truly missed you!
♥


 Sorry that I forgot to remove all those hot glue strings before styling these cuties. :)


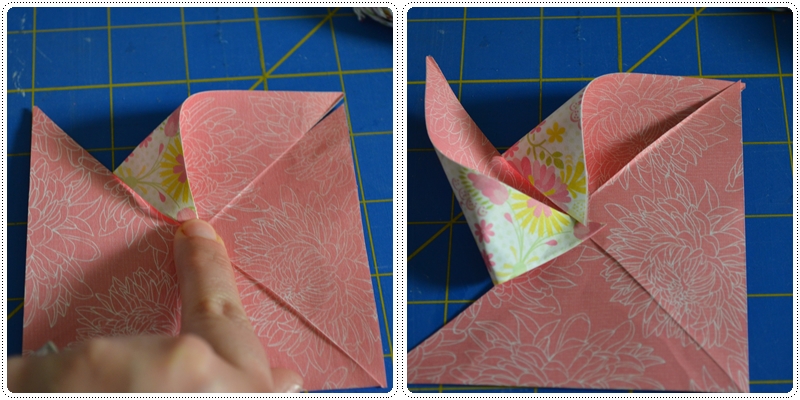


 How fun would it be to open up this invitation?


