Hello sweet friends.
I wanted to share with you this little topiary for a couple reasons. First...I made it awhile ago during my blog hiatus and I thought it would be fun to share now that I am back in the bloggy swing of things.
But secondly, I wanted to provide a nice picture tutorial that will help those who have been inquiring about my White Ruffly Spring Wreaths and looking for a tutorial. I actually get several emails a week inquiring on how to make them so I hope to do a vlog how-to but until I can actually get to that...this should do nicely for those who are still unsure how to make the ruffles.
You will be excited that they are super easy. Just time consuming to finish but OH SO WORTH IT.
Let's get to it, shall we?
So here's what I used for my project:
Material cut into 2-3 inch circles
(amount depends on size of project)
Fabric scissors
Straight pins
Styrofoam ball (size optional)
Stick from my yard (yay for free!)
Terra cotta pot that I distress painted
Moss as a top filler
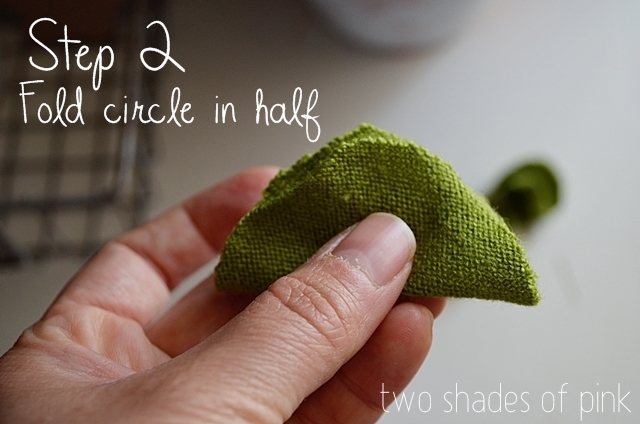
I actually used an old sweater that had pilled (boo) to make this but you can obviously use any kind of fabric or felt of your choice. Also, the fun thing about ruffles is that your circles do not have to be cut perfectly but do try to make them uniform. To make several, I cut out a strip of fabric and fold it over several times into a square and cut out my circles.
So far so good...
And literally that's it. There's your first ruffle.
When pinning them, try placing them close together and in different directions for better coverage. Also, when making a wreath, it is important to wrap the wreath form with ribbon first so the styrofoam doesn't show or start to break apart. I was lazy with my ball (as you can see) but I probably should have wrapped it with ribbon or fabric but wrapping a ball is not as easy. :)
Continue placing your ruffles all over your ball and your done!

It's true.
Who knew?
After I finished ruffling up the styrofoam ball, I used a stick for the post and placed it in the pot, anchoring it with newspaper and topped it off with some moss I had on hand. A good tip I have read somewhere (probably pinterest) is to anchor it with spray foam.
I use what I got, folks. You get me.
Well that's about it. Hope you enjoyed this little mini tutorial.
Have an incredibly blessed week sweet friends.
xoxo


Such a cute idea! Thanks for the tutorial : )
ReplyDeleteI am going to try this!
ReplyDeleteThis comment has been removed by a blog administrator.
ReplyDeleteYou are So detailed my friend! I can see A TON these little cuties adorning homes all over the world now just because you showed us this fabulous TIP!!!!! ♥♥♥
ReplyDeleteLOVE that you used your old sweater!! I love anything that saves the world!! LOL THANKS for sharing and so glad you are creating!! XOXO Love Fran.
ReplyDeletethis is a great am going to try it xx
ReplyDeletevery nice.Would also look nice in burlap
ReplyDeletelove this so much. Want to go buy a goodwill white sheet and make the ruffly wreath. Thanks for your time. That is alot of straight pens by the way lol
ReplyDeleteI cut my circles last night and made the wreath this morning. Turned out great. I used a 12 inch foam and 400 circles. It was full and fluffy. I covered both sides.l
ReplyDelete