Image Map
Showing posts with label Gettin' Crafty. Show all posts

April 26, 2011

DIY Fabric Plate Chargers

Is it a charger?  A placemat?  A hybrid of both?
I honestly don't know but I am calling them chargers.

I can tell you that this is one of the most satisfying DIY projects I have ever done!  Nothing is more fun them making something both pretty and useful.  Such bliss.

My initial color scheme was my no fail, go-to colors of light aqua and pale green.  But I could not find any fabric that spoke to me. My husband had actually suggested we use two shades of pink (how cute is he?) since the theme of the gala is "We are Family." When I saw this fabric I fell in love with it and switched gears.

I saw a similar project like this recently where wrapping paper or contact paper was used on fiber board. But can not remember where.  If any of you know where you saw something like this, please contact me so I can add a link and give proper credit.  While churning this idea in my head for the Gala, I spotted some FOAM BOARD at the dollar store (while buying my little birdies).  I figured that would work and it was inexpensive too!
I started off by seeing what a place setting looked like.  
(Do you like how I did it up  a bit fancy?) 
 I then figured I would need 15 x15 squares and began cutting with a rotary cutter and cutting mat.
And they all turned out different sizes.  With me measuring it.  Causing me to sweat with moderate anxiety. Just so we are clear on my math prowess...if the free world's existence depended on my math skills...the world as we know it would end.
So I called upon this sweet guy who I happened to be married to measure and cut the fiber board FOR me.  Which he did.  CORRECTLY. Look at him lovingly sweating it out on our unpainted garage floor.  That is devotion. I gotta tell ya I love this guy to pieces.  And do you also notice how I posed him cutting an already perfectly cut square since I did not think to take a photo until he was already done?  Just keeping it real folks.
So my cut boards ended up measuring 13 x 13 and PERFECT!  
15 x 15 would have been too big.
I cut my material with about an inch (give or take) allowance on all sides.
After cutting and ironing all my fabric pieces, I laid out a foam board square and cut out the corner (blue dotted lines) to help me fold over the excess fabric onto the back of the boards.
With the right side facing down (wrong side facing up), I sprayed the entire piece of fabric with spray adhesive. You can use Mod Podge too but it will take longer.  
This method took me only 30 minutes.
Working quickly, I lined up the foam board corners with the cut out corners and began folding up the sides. I worked two opposing sides together so I could pull the fabric tight as I worked.
 It will end up looking something like this on the back...
And like this on the front. :)
 These really took me no time to make.  (Special thanks to the hubs).
A great finishing touch would be to put felt on the back.  I may actually try using cork liner.
(the kind you line your drawers and shelves with)
It's getting fun now, right? 
What do you think of these easy DIY chargers?
So many possibilities...

I may share the centerpiece or favors and place cards tomorrow.  Still not sure.  
But I will know by then!
I am beyond excited to see what the whole thing will look like at the end of the week!
Hugs!
xoxo

linking to this week:


March 15, 2011

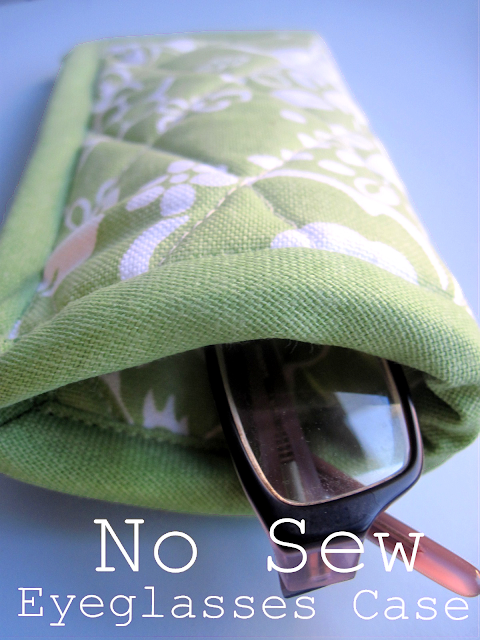
No Sew Eyeglasses Case: Good Living Magazine Project #1

 
 I am so excited to share this easy peasy tutorial!  
I have gone back and forth on when to post these projects but the magazine I craft for has been a bit ambiguous on their actual print date but the article and three crafts I made direct back to this blog for the tutorials in the march archives.  And they are more geared towards Easter and Mother's Day so sorry if this is kind of early. But having finished tutorial posts just sitting there waiting to be published is hard!

So here is Project #1:
 This is actually a spin off  of a craft I did last year around this time.  
You might  remember this one below...

An eyeglasses case made from a potholder!

February 16, 2011

Neighbor Gift Idea

Y'all will NOT believe this... 

I have been a slacker neighbor.

Yes it is true.

It's ironic since so many of you were so empathetic and sweet when I did the post about us moving in and no one talking to us from the neighborhood. For those of you who missed it...when we first moved in our new home, it was kind of lonely.  It had made me so sad until I realized there was nothing wrong with me making the first move and introducing our family to the neighbors.  Check out how I did that here.  I called it sconing the neighbors.  After we did, everyone waved, stopped by, set up play dates...it was amazing.  And we are so thankful!

But in August, our next door neighbors moved and our new neighbors began renovations that lasted through November when they finally moved in.   

AND I NEVER OFFICIALLY WELCOMED THEM! 

Ugh.  The holidays swept me up on the festive train to crazy and I just plain forgot.  But it kept coming to mind and I finally put a plan of action into place to scone my new neighbors and give them some extra goodies too.

First, I wanted to give them a framed picture of their new house.  But I don't know their style so I wanted to keep it safe. A white frame.  Check.  I also wanted the picture to be fun.  So one day I took a photo of their house and worked a little techy magic on it. I wanted the photo to look like a drawing so...
It would go from this...

To this.
I had to edit it a lot because of shadows in front of the garage but I finally completed it. 

I think it turned out so pretty and polished looking in the frame.

I printed it out on some sturdy, white card stock and made sure to use a matte in the frame to make it look even better.
 
I baked THE SCONES and put them in a glass vase with a ribbon tied around it. 
(I used a glass vase just in case they did not have one handy since I was also giving flowers)
Using one of the cones from the Valentine issue of Good Living Magazine, I filled it with the bouquet of flowers and attached a family photo with our home phone number on the front.
 This is what I wrote on the back. 

I put it all in a basket (I have way too many) and we brought it over to our INCREDIBLY NICE neighbors.
The presentation came out so sweet. And guess what else?  They said they never had anyone do this before and they were so touched.  We ended up getting a tour of their lovely home and chatting for over an hour.

What a blessing they are!
 I know the welcome basket was late but I believe it is better late than never.:)

February 3, 2011

Stitched Paper & Felt Valentines

So I am gearing up for Cati's Class Valentine party and as the "Party Mom" (that title cracks me up) I have been busy working on a ton of crafty goodness to decorate.  Of course, no Valentine party would be complete without...well...valentines. :)
 
I wanted to make homemade ones and since I heart all textures like fabric, felt, and yarn... I wanted to incorporate some of it into a Valentine card where Cati could still sign her name and put her classmate's name since she is learning her letters.
If you want to try this yourself here is what I did:  
Materials: 
white card stock, red craft felt, embroidery floss various colors, colored pencils, and craft glue.

1. Cut your card stock (I used a craft mat and rotary cutter) to the size you want.  Mine is 6 x 3 inches.
2. Cut your red felt backing slightly larger.
3. Cut out little felt hearts
 
 Use running stitch to sew heart to the top of card stock.

I used colored pencils to write out the "To" and "From" with the same color as the embroidery floss. Then I sewed over it using the colored pencil letters as a guide.
Glue card stock to felt backing.
There is your simple and unique Valentine's with some homemade flair. 
 Just the way I like it. :)

January 18, 2011

Pretty Paper Cones: Good Living Magazine Project 3

I know paper cones are not necessarily something new but I love making them. 
Maybe they are new to some of you?
For me personally...I always like to find out how to make things that seem simple but I can not quite figure them out until I see it step by step.
And there is something so endearing to me about pretty paper becoming a functional object or container.  And I love containers. Madly.

Once, I was in a group of people and we were all introducing ourselves and part of the intro was to say one thing about ourselves. My one thing?  Hi, I am Jessica and I like containers
Yes, I did. 
Fortunately, people laughed but I totally revealed the geek I am.  

Okidokes. Let's find out how to make these cones...
 You need 3 sheets of 12x12 scrapbook paper, glue gun and ribbon (optional)
 Turn the paper so it is in a diamond shape and begin rolling the corner facing you into a tube.
 As you roll, keep the end to the left tighter while allowing the paper to open a bit on the right on the tube.
 Keep the left as tight as you can but don't allow the top of the cone on the right to get too loose.  Then it will lose its shape.
 When you are finished play with it until you like the shape.
 Use glue to seal it off and glue another open seams.
 Wait until it is dry.
 There you have some pretty cones to dress up a flower arrangement.
 You could even wrap a ribbon around it to give it a nice finish.
I just love how the red roses look with the ivory and black stripes.
 These cones are great for cotton candy, Valentine treats, favors, or whatever else your creative mind can come up with.
Here is another fun idea...bless someone with a flower arrangement on their door and leave it anonymously! Here, I hung the flowers by putting them through a heart cookie cutter and tied off a ribbon on the cookie cutter. You could even use napkin rings or even soup cans and mason jars tied off with twine or wire. 
A fun Secret Valentine gift or even one for a neighbor.
The end. :)

So the heart garland, the secret cookie messages and these paper cones are my 3 projects for the latest Good Living Magazine issue.  Hope you like the projects and when I get the online version of the magazine, I will post it on my sidebar.   
Actually, I have not even seen it yet so I am excited to know how it will turn out. 

Now I am off to get to read a book and get over this flu that has turned into me walking a fine line between bronchitis and pneumonia.
That will keep for another post.

HUGS!