Image Map

May 2, 2011

Guest Posting at Free Pretty Things For You!

Happy Monday everyone!

Just wanted to let you know I am guest posting today at Free Pretty Things For You to share a tutorial on how to make a Mother's Day Balloon Pocket Card
 You may remember this card I did for the Thanksgiving issue of Good Living Magazine.

Now this one is more GIRLY..perfect for Mom's Day!

I even included a selection of printable tags and the template for the card!   
Tons of fun!


Click here to download

Click here to download.

So go check it out and tell me what you think!

May 1, 2011

My Pretty Tablescape

 Well here it is.  
I actually have to apologize...none of my photos really turned out and I was busy doing stuff until they turned the lights down so I could only get those orangey glowy type photos that never do the real life thing any justice.  So I de-colored this a bit so you could see it without thinking the table itself was aflame.
Yet you will have to contend with a blurry photo. 
Forgive me?
And forgive me for those water bottles in the pic...hope it does not ruin the aesthetic. 
I truly wish these photos did justice to how pretty it turned out.  It was so elegant.
Actually,  those pink roses cracked me up. I envisioned a symmetrical arrangement looking both understated and gorgeous.  Yet here was me...without my heels on yet...cutting the flowers at mach 2 speed and shoving them into this glass bowl thinking it needs one more...it needs one more.  So surprised one did not spontaneously shoot upward. Someone could have lost an eye.
To create a bigger centerpiece, I put this birdcage next to the branch and nest.  ( I took this shot during the morning set up). At the beginning of the night, I actually tried elevating the whole thing on an upside down tray with the fabric I used for both chargers and napkin wraps but I encountered an unexpected development when I snapped off some little branches off the big branch centerpiece!!!!!!  As I began hyperventilating, someone literally came out with a hot glue gun and some glue sticks for me.  A total God moment along with a joint effort to not have a table hostess laid out in cardiac arrest due to craft failure.
It must have been awesome seeing me kneeling in my black dress at the nearest outlet with a glue gun and my precious family nest and branch. But all was well and the idea of an elevated centerpiece was abandoned.
All around the table we had photos of our family and our parents.  Little conversation pieces to talk about our special family.
And as part of the centerpiece I included the family picture that I have here on this blog.
 Look at this cute couple.  
But seriously these two need to grab a few celery sticks instead of the cheese doodles.  I am detecting more chins then we thought we left with from home. 
Brandon was not necessarily pleased once he read this. :)
My BFF Kelly and me.
My guests LOVED their favors which was the one thing I worried about.  They did not know that but they probably do now since they now know about this here blog. I seriously had the best table everrrr! Seriously, y'all...I met some crafty soul sisters...yes , I mean you Shelya and Lauren!

Shelya is an amazing photographer and Lauren is HILARIOUS and kept cracking me up all night.  And she has a love of birds like I do...one we both can not explain but must feed on a regular basis in our decor.  Much to the apparent chagrin of our hubsters. And darn it all...I never got photos of them.  But seriously...love em! And they all have hearts for adoption!  Seriously...meant to be!  I will stop gushing over their coolness.
And the place setting which looks exactly like all the other photos this week.  Not that exciting.

Oh, and in case you were curious both the fabric houses art and the runner and napkin rings set did really well!  So happy people liked what I made.
 It was loads of fun and we actually bid on these freshwater pearl earrings and we got them!  
I absolutely love pearls and they are actually my birthstone. So excited!

Now this officially concludes all my tablescape posts.

~The End~
:)

April 29, 2011

Bird Themed Favors and Placecards

Oh friends.  If you only knew the drama that has played out over these favors and place cards.  I seriously had no idea what I was going to do and stressed over them as if my life depended upon it.

Yes, over people's names and a little thank you goodies. To know me in real life, is to experience the intense anal retentiveness that is my reality.

So this post will show you what I came up with and also what I TRIED to do and what did not work out.

It'll be fun.
Once upon a time there were these little $1 bird houses. 
You were such a quandary to me in how I was going to use you yet your bird themed essence and cuteness-on-the-cheap made me purchase you.

And then paint you. The end.

Now what?
So I racked my brain thinking maybe I would make these the place cards but that just did not sit right.  Not what I was going for.  Then the Hubs suggested cute little bird magnets. Brilliant. It would be quick and cost me zero dollars.
So I made these which my Ella called little bird pillows.  Love her.
When she saw they had magnets on them she was ecstatic.
If you look at them for long periods of time, you will begin to wonder if they are actually tadpoles coming into their froggy-ness.
 So I attached each bird to a house.  Just a little scotch tape worked.
And wrote a little thank you note on each roof.
It's cutesy and fun.  I like it.
Now for the place card idea that FAILED...
I came up with the idea of using a bird bath for each place card.
But what could I make into a bird bath? 
So I got to work experimenting.  I grabbed a candlestick, a pink ramekin, and a little dish.  I figured if one of them worked, I would glue it to the top and spray paint the whole thing.
Nope.  Looks too much like a wine glass and just did not look right.
 Neither did this one.
 I kept staring at my candle stick and then wondered...what if I flip it over???
Yes! 
Perfect!  It looks just like a little bird bath!! 
What if I paint the inside and add a little bird place card!  ADORABLE!  
I bought these at the dollar tree and I knew I could get a bunch more!  Yay me!
Um, no. My sweet husband was on the hunt and went to every dollar tree near us.  None.

Back to the drawing board.  
But I had to share in case one you are lucky to find them at yours and can tuck this idea away.

So here is what I did.  The backyard was becoming the hottest spot for this tablescape, so I gave that  a whirl again.  And I found some little branches.

And dry brushed painted them with a little light grey paint. 
The color is called Old Faithful.  Isn't that a great name?
And I added some paper punch out leaves.
They match perfectly and each side has a different pattern. Love, love, love how they turned out!
The actual place cards I agonized over.  I finally went with simple using a a pink cardstock with a pretty sheen on it, a circle punch, a pretty font, and some pale green ribbon. I tried birds (but I felt we were getting birded out), bracket labels...nothing looked good.  Turns out...simple works best. :)
 Another idea is to use a place card with a bird clipped to the branch.  I saw a set of 6 white birds at Joann's that would be really cute. 
 Tomorrow I will be setting it all up and then tomorrow night is the big night!!!
I will do my best to take photos but I may not get to show them to you until Monday.

Thank you so much for coming along with me on all these tutorials to a beautiful Spring Tablescape!
I hope you liked it and I can't wait for you to see the whole table put together. I will be adding some extra stuff you have not seen yet to give it the final touches and to match our theme!

I am so excited!

April 28, 2011

No Sew Napkin Wraps


 I am fearing that this post will be anti-climatic after already revealing the centerpiece.
So please comment just to be nice, OK? You are the BEST!
The idea for napkin wraps came to me after I realized I did not have any pretty napkin rings. Or even napkins to match.  I bought this pink coordinating fabric but still needed napkins.

You should have seen my high and low search for just the right napkins.  Drove myself crazy.  Drove my family crazy.  But then Marshall's had these adorable teapot ones and I had to have them.
Even if they don't match since they will be rolled up or in someone's lap. 

You probably don't not know this but I have this thing for teapots.  I collect them.  
So when I spotted this precious little embroidered teapot, on the perfectly colored napkin, that cost $3.50 for four...I was sold. It even has a bird on it.  It looks prehistoric but whatever.
So to make these, you need fusible bonding tape and some velcro dots .
Iron-on adhesive tape saves you from sewing.  Amen.
First, I rolled up my napkin to figure out the length I would need to wrap around a rolled napkin.
 I needed about 6 inches around for it to be tight when I closed the wrap.
Now I tried measuring this out to help you if you wanted to make these but I realized this is pretty much personal preference.  I made these to fit a tightly rolled napkin but they might not work if you wanted the napkin another way.
Then I used a piece of paper to figure out how wide I wanted it to be.  
This happened to be too much so I just folded it to a width I liked.
I ended up cutting 5 x 8 inch pieces of material to make the size I wanted.
Definitely follow the directions on the fusible bonding tape.  But here's what you basically do...
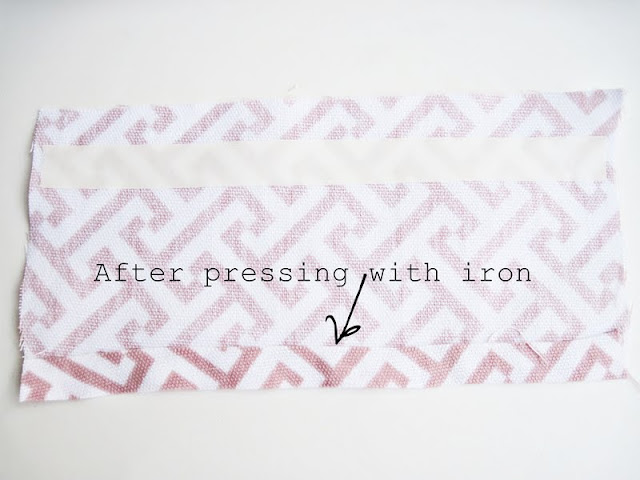
Fold the edges over twice and iron the crease.

Put the fusible tape (paper side up) on the crease and press with an iron for 2 seconds on medium heat.  
LET IT COOL!  
Then take the paper strips off revealing a clear adhesive strip.
Fold the edge over and press with iron for about 8 seconds. 
It should look like this.  Do this on the long sides first then the short sides.
Now we have finished edges with no sewing involved.
To add the velcro dots, I placed the fuzzy sided ones on the edge of one shorter side.  I used hot glue to reinforce them since the package said not recommended with fabric
Note to self:  Read labels before purchasing.
Then I wrapped it around a rolled napkin and aligned the scratchy dots with the fuzzy ones.
Now you can just roll and wrap.
It would have sounded so much cooler if I could have said wrap and roll. Dang.
I just love this color combination together.
Here it is coordinating with the fabric chargers I made.
It would be so pretty to wrap ribbon around this with a little place card.
Add buttons or snaps instead of velcro.
Even decorative buttons on the outside on the seam would be pretty too.

And if it is not already obvious, this method works for making custom napkins too!

Tomorrow is the last day where I will show you favors and place cards before I set it all up Saturday morning.  I have changed my mind 172 times so I wish I could give you a teaser but I still don't know.

See you tomorrow!
Hugs my sweet friends!