Image Map
Showing posts with label garland. Show all posts

June 1, 2013

A Happy, Summer Chalkboard

HELLO SUMMER!
No more schoolwork, field trips, signing forms, remembering dress down day or show and tell, no book reports, spelling tests, history narrations!
SUMMER IS HERE BABY!
And I'm straight up stoked about it.

So why not greet summer and pretty up my chalkboard with stenciled lettering and a fun way to remind us that the relaxing warm season is here?

March 29, 2012

Spiraled Yarn Circle Garland

Whoa.  Two posts in two days. Shocking. But I wanted to share this fun tutorial to make this happy little garland.  I shared it last week on Kimberly's blog...bugaboo, mini, mr. and me.  She has a great Yarn It All series going on sharing all things yarn.  It is awesome.

I have been drooling over all the colorful crochet garlands I see out there.  So I decided to make my own version without the awesome crochet skills but still all the pretty. I am excited to share it with all of you!

Here's what you do to start making cute little yarn circles with the help of some paper and glue...


It's pretty easy and quick too!  If you don't have a circle punch just trace and cut a circle with scissors. I suggest using card stock the same color as the yarn in case you have some gaps. Also, I find hot glue to be the easiest to work with since it dries so fast and keeps the yarn from un-spiraling. You just have to  be careful not to burn yourself.  I have worked with hot glue so much I think I no longer possess fingerprints. :) 
Here it is in my Spring Vignette that is still a work in progress. Fun!

Hugs and blessings!

January 16, 2012

DIY Arrow Valentines

Did you all think I forgot you? Could never happen...you are all so dear to me. But I have been trying to let this broken arm heal and it has made me a bit restless. I actually walked around the block the other day and just basked in the glorious solidarity of it. Meaning...I was alone!! And my girls became dreadfully sick. I truly wish you could see me propelling my one armed self out of bed at all hours of the night. My husband yells at me to lay down but those are my babies...broken arm or not I have to take care of them. :)

So I got in some crafting. I almost did not post these. Taking photos was totally challenging and one arm crafting is just plain hilarious! But then I figured with all the flaws, it might impress some of you that I did these one handed. Well, one handed with some right handed holding of objects. So take these with a grain of salt and hopefully you can at least come away a wee bit inspired. 
These are made with wood dowels painted white. I glued fabric, felt, and lace arrow heads and "feathers" while wrapping the middles with odds and ends like pieces of measuring tape, washi tape, yarn, and ribbon. I love the look of the random numbers from the measuring tape. Really fun.
I attached these painted wooden tags tied on with bakers twine. From left to right the hearts are made from red ticking, pink yarn, red felt, and white lace.
A message is easily written on the back to your special Valentine. These would make great gift embellishments or even use as clues for a scavenger hunt. Leave them around the house attached to little treats for your spouse or kids. They were a ton of fun to make and I bet more so with two hands!
 I have more fun ideas coming...slowly. But they will come. :)


I am also dreadfully notorious for sharing big news here on the blog and then show up with a craft and never mention anything else. So here is the latest on my arm...I have an appointment Thursday and I am praying I can be cleared to DRIVE! I am pain free and can move a lot better but the arm is atrophied so I am working on that. I do not have a true cast. Just a splint and ace bandage that I can take off to shower and work on moving my arm. I am assuming some PT is in my near future.

We have had neighbors and friends blessing our family with meals, driving Cati home from school, and just loving our family up. I am humbled by our friends and church family.

But the reality of it all set in this week when I found out from a neighbor that the paramedics said people typically don't survive a fall like that. Then yesterday my husband was up in the attic and I literally started crying in a full fledged panic. Those who know me in real life know this is not really me. I guess seeing the ceiling move and buckle as my husband walked around that hole FREAKED ME OUT!


I'll catch up with you soon friends. Hugs to each of you!
♥

October 5, 2011

Pine Cone Flower Garland

PINE CONE FLOWERS...LOVE!  
This is such a pretty DIY!  I love that this simple garland is an easy one! All you need are pine cones, some felt, garden shears, hot glue, wood beads, twine and paint (optional).

And in all honesty...my obsession with garlands needed to be fed for the Fall Season. :)

Our neighborhood is full of long leaf pine trees so we have pine cones EVERYWHERE.  It has been fun hunting for pine cones with my girls and teaching them how to find pine trees.  And I must say I crack up when my youngest daughter points to a palm tree and calls it a pine tree because they have "pointy" branches.  It really is weird to have palm trees and pine trees next to each other in Florida.

I digress.  So.  It would not be the Fall season without throwing some pine cone love in the crafty mix.
Now gather a bunch of pine cones.  The bigger the better. Grab some wood beads and cut out about a dozen 2 inch felt circles.
1. Using the garden shears, cut all the little sections off the pine cone.  
2. Hot glue them around the felt circle in a flower pattern (as if they were petals) until you get to the middle.  
3. I tried using the biggest pieces on the outside edge (found towards the bottom of your pine cone) and the smaller pieces towards the middle. 
Instead of filling the middle with smaller pieces, use one of your wood beads as the center of your flower to make them look different.
I decided to paint some of them white for a bit of rustic distressing added to it. 
It nicely satisfies my cottage style heart. 
♥

And please don't tell me it looks Christmasy.  
Let's pretend it doesn't. 
I almost did not post this because I thought it looked Christmasy but then I figured no one else has to paint them or use white if they did not want to.  
So I posted it. Yay me. :)
Postscript:  I have already seen this pinned 3x under the category Christmas.  Sigh. So be it. :)
To create the garland I just hot glued twine to the top of the felt circles (they are slightly heavy) on the back while spacing my flowers out evenly. I ended up using about 5-6 pine cones to make 12 flowers.
So pretty!
I hope you make some pretty pine cone flowers too!
Let me know if you do!
Hugs to all of you Fellow Fall Lovin' friends!

May 29, 2011

Guest Posting at Yesterday on Tuesday: Knot Tied Fabric Scrap Garlands

Hi Everyone!  
So sorry there have been an orchestra of crickets on the blog! We just got back from having so much fun at Disney.  Aside from the hubs forgetting his license, having our stroller taken after 30 minutes at the Magic Kingdom on our first day,  scaring the daylights out of our girls riding the Peter Pan ride (really?), my Ella terrified that the tunnel on the "It's a Small World" ride was like the tunnel in Willy Wonka and the Chocolate Factory and literally panicked (we now fast forward through that part but I guess it left an impression)...it REALLY is the happiest place on earth. 

This is also my time to be crafting for the magazine so I kind of get focused on that and the blog becomes a bit silent.

But hop on over to sweet Malia's lovely blog ...Yesterday on Tuesday where I am guest posting to share two no-sew garland tutorials and all you need to know is how to TIE A KNOT! 
This one...
...annnnnnd this one!


I seriously love the easy ones.


Take a peek!

May 11, 2011

Fabric Vine Part 2: Petal Flowers

I honest to goodness hope and pray that fabric flowers never go out of style.  I hope we wear them, use them in decor, and put them on anything remotely flowerable until I am old and grey.  My love of flowers and gardening grows each year but to be able to craft them from fabric or other materials simply fascinates me.  And they last which makes my joy for them truly complete.
This fabric garland makes me so happy.  When I made the leaf garland, I was not sure what kind of flowers I wanted to make or if I should even add them.  I am so glad I did! I love that the flowers make this so versatile.  From decor, to a party, to holiday decorating.  It is just so pretty.  And the different kind of flower possibilities make me swoon with delight!  Aren't I sappy over this thing?
I want to share with you how I made these flowers.  I originally got this diy flower pin tutorial from Momtastic. She used this petal flower to make a pin but I tweeked her tutorial a bit by making these flowers become removable by adding little twisty fasteners.

Here is MY tute...
To make this you will need: scissors (that cut fabric), a glue gun, several large and several small petals and a small felt circle. Cut out several large and small petals for your flower.
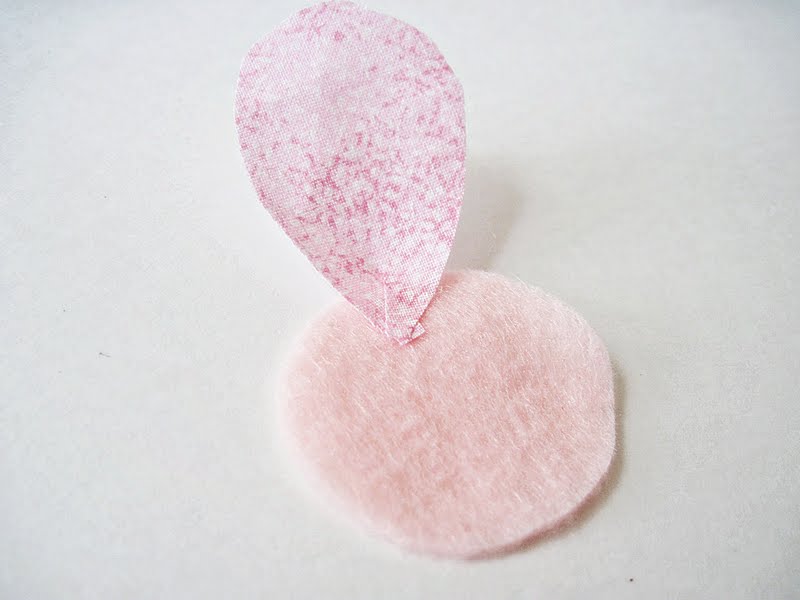
  Cut a slit at the bottom of each petal. It will look like it has little legs. :)
 Starting with one of your LARGE petals, cross the legs and hot glue them to your circle.  
This helps the petal stand up.  
I tried a zillion different ways to do this and this way works the best.
Do this all the way around with your LARGE petals.
Now start a second row with your small petals. Keep doing this until you get to the center and have the fullness you want. I ended up cutting out even smaller petals for the center.
Now you made a pretty little flower.  
I decided not to put anything in the center but you can definitely add a fabric/regular button,  pearl, bead or whatever in the center to give it a more finished look. Nothing suited me so I just left it the way it was.

Now for the backs...
You need all this stuff and your glue gun too!
Make a "U" shape with your wire and hot glue it to the back of your flower on the felt circle.
Add a little more hot glue and cover the center with your little felt square and you are done!
 Just fasten it to your vine like a twist tie and you will have a fabric flower and leaf vine.
 I just love it.  How about you?

On a personal note...
I actually need to ask you to be thinking and praying for our family.  My precious grandmother, my Mema, took a fall on Mother's Day breaking both her wrists and 2 ribs. She can not even feed herself due to her broken wrists. The following evening she was in her recliner since her bed made it too painful to breathe, and fell as she got up becoming caught in the opening between the chair and foot rest.  It is just awful. 
Sadly, our fears were realized today and she is now developing pneumonia. 

They are putting her in hospice and I am going to travel there alone in the next few days.   I just ask for peace and strength for all my family members.  And for my broken heart.  I love her so much and I will miss her terribly.  But I want to see her one more time.

Thank you so much for being my friends and always showing you care.

May 10, 2011

Fabric Leaf Vine Garland: Part 1. Yes. It's Another Garland.

Are  you getting tired of my garland obsession? I hope not.
It's just that there are a gazillion ideas running through my head all the time.  I truly can't help it. I love them and so I must make them. And blog about them.  I may need a garland intervention.
I think I am in birthday party mode at the moment. Party pretties and decorations are consuming me. I usually am like this by Spring of each year since my girls share a party having a birthday 2 weeks apart in the middle of Summer.  They love sharing their party (yay for me). And I love decorating and planning the theme yet this year they had other ideas.

Their OWN ideas.  Really?  This young?  Oh well. 

I figured I can get my fix by doing mini parties with one or two of their friends over the Summer.  I have visions of vintage tea parties, outdoor summer picnic parties, a girly glam camp out party.  These were MY ideas that were still fun but PRETTY. I simply like pretty things.

What do they want?  A bounce house or a slip and slide. And it is about them.
I am totally doing it but the fancy girl in me is very sad. But I know I can get creative. :)

Back to the leaf garland...
This one has been on my mind for a possible Etsy shop item. I like the versatility of using different fabrics and colors and then adding removable flowers to them too.
This idea came to me after I made the branch place cards.
All you really need is some coordinating fabric, twine, and a glue gun.
I happen to have these adhesive fabric fuse sheets on hand but double sided fusible interfacing works perfectly too when going a no sew route.
After bonding the two fabrics together, I free hand cut leaf shapes of small, medium, and large sizes.
First step is to create your vine by cutting a length of twine and then cutting small pieces for your "branches."
Tie each piece in a knot.  
I tied each one tight enough so it won't come undone but loose enough that they can slide on the vine to make it as full as I would like.
Add a line of hot glue down the lower middle of one of your leaves, and squeeze the bottom of the leaf around a branch creating a leaf vein.
I did not pay attention to which side of the leaf faced up to add interest and not one specific pattern.
The more leaves and branches you add to your vine, the heavier it gets.  It is not heavy at all for hanging but be aware that you will need to tie it to something in order to hang it.
 It is pretty easy and totally worth it!

Tomorrow or later this week I will share this with you with flowers that  you can add and interchange with it.
Have a fabulous day friends!