
 As Valentine's Day approaches I have been having some fun with little craft ideas specifically centered around my kiddos. My hubby and I definitely love the romantic thing but having little ones, we make Love Day a family affair. So these little treats are sure to delight any kid who receives them.
Showing posts with label Valentine's Day. Show all posts
Showing posts with label Valentine's Day. Show all posts
February 10, 2014
"Shot Through The Heart" Rice Krispie Treats
As Valentine's Day approaches I have been having some fun with little craft ideas specifically centered around my kiddos. My hubby and I definitely love the romantic thing but having little ones, we make Love Day a family affair. So these little treats are sure to delight any kid who receives them.January 24, 2014
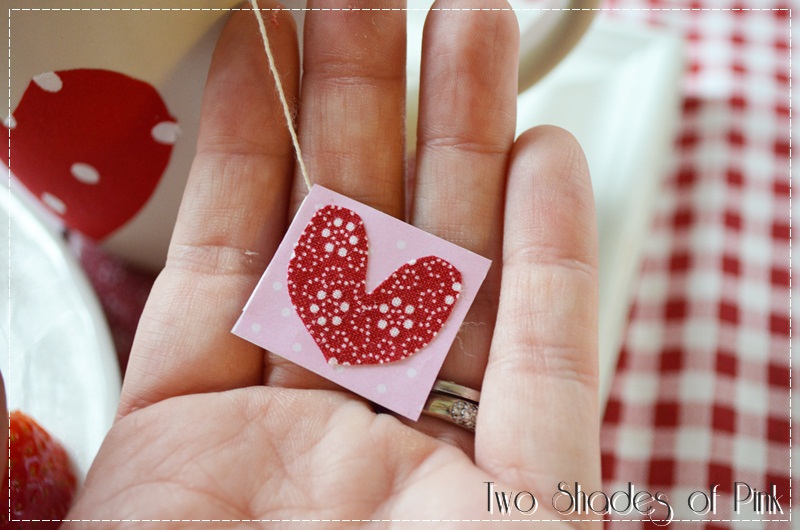
Mini Love Notes on a String

(she says with her tail tucked between her legs)
Is there a way to blog and have a life? I just need to know. I am constantly lamenting this to you yet I have found no viable solution that will enable me to craft and blog while meeting the needs of my family. Who comes unequivocally first.
But this space gives me such joy...such satisfaction using gifts that only a creative God could give. I love using my hands to create things yet I see how life is literally fast forwarding and I miss it when I am staring at a bright glowing screen that draws me in and then traps me there until I can shake myself out of it. I know there are people who can do this...this balance thing. But for me....someone gets the short end of the stick and it s often at the cost of someone I love.
February 7, 2012
A Sweet Valentine Breakfast

Oh Happy Day!
♥ I am actually writing a post! ♥
It feels so good to be using both my arms and crafting again. I have to tell you that all your emails to see how I am doing has filled my heart to overflowing. It never ceases to amaze me that blogging has brought so many of you beautiful friends into my life. To sum up, I am about 70% healed and I am about to start a little physical therapy to get this old elbow to straighten. But I am doing great!So getting a little crafting in has been soothing to my soul! I feel like I am using a part of my brain that was lying dormant this past month. And I have to tell ya...Valentine's Day is one of my FAVORITE holidays to create for...maybe it is being a mom to girls? Or my love of red and pink? Who knows but this particular project was fun because I used my favorite method of crafting: USE WHAT YOU HAVE to make it SIMPLE.

I came up with a little Valentine breakfast for Daddy (or Hubby ♥). Obviously, the men in our lives may possibly get the short end of the stick on this particular love day so what better way to celebrate them? And a little attention to detail makes this oh so fun!

Your first little project is this easy DIY tray made from a large picture frame. Attach two handles by screwing it in on the sides and put pretty fabric or a Valentine message inside the glass and you have a perfect tray for your breakfast!

Next, I gave some coffee mugs a little "heart." A fabric heart, that is. As many of you know, I will cover anything with fabric or yarn if I am able. And how fun to make an everyday mug festive that can be removed later?

I cut out some hearts from scrap fabric and used my little Xyron sticker maker.

Then I simply attached them to the mugs. Um, so simple I probably did not need photos. :)
Now fill your pretty mug (In this case we used tea since that is what my husband and I drink). I also attached a pretty paper tag made from scraps with a fabric heart.

Just another personal touch to add more looooove.

These heart skewers are made with fabric and yarn wrapped pipe cleaners.
Here's a quick how to:

1. Wrap a strip of fabric tightly around your pipe cleaner. The color does not matter with fabric but with yarn, try to match the color because the yarn is so thin.
2. Secure the ends with some fabric glue ensuring you can't see the end of the pipe cleaner and form a heart.3. Trim a bamboo skewer to size to twist your heart onto.
4. Twist the ends around the skewer tightly and glue to your skewer.
5. You have a pretty DIY heart!

Pop your cute skewers into some yummy chocolate chip scones (a favorite at our house) or use them in cupcakes or on a cake. Add these cute heart doilies colored by the kiddos for an extra dash of sweetness.

Cut some from flowers from your yard (if you are from Florida like me), make your own from fabric or paper, or of course you can buy some! My friend gave these pretties to me when she brought me dinner and covered it with a little sweater sleeve. Just perfect!

And look...it's a little water bottle! How smart! (thanks Lisa!)

Wasn't this fun?
I hope you like all the simple ideas to make Valentine's Day special. Husband's and daddy's deserve a little extra love and thought and what better way then with some yummy goodies and precious touches from the little ones?
Hugs and loads of blessings to each of you!
♥XO♥
linking to:
show and share
creative me @ the southern institute
oopsey daisy
the 36th avenue
lollyjane
a crafty soiree
tatertots and jello weekend wrap up
be different...act normal
under the table and dreaming
linking to:
show and share
creative me @ the southern institute
oopsey daisy
the 36th avenue
lollyjane
a crafty soiree
tatertots and jello weekend wrap up
be different...act normal
under the table and dreaming
January 16, 2012
DIY Arrow Valentines

Did you all think I forgot you? Could never happen...you are all so dear to me. But I have been trying to let this broken arm heal and it has made me a bit restless. I actually walked around the block the other day and just basked in the glorious solidarity of it. Meaning...I was alone!! And my girls became dreadfully sick. I truly wish you could see me propelling my one armed self out of bed at all hours of the night. My husband yells at me to lay down but those are my babies...broken arm or not I have to take care of them. :)
So I got in some crafting. I almost did not post these. Taking photos was totally challenging and one arm crafting is just plain hilarious! But then I figured with all the flaws, it might impress some of you that I did these one handed. Well, one handed with some right handed holding of objects. So take these with a grain of salt and hopefully you can at least come away a wee bit inspired.

These are made with wood dowels painted white. I glued fabric, felt, and lace arrow heads and "feathers" while wrapping the middles with odds and ends like pieces of measuring tape, washi tape, yarn, and ribbon. I love the look of the random numbers from the measuring tape. Really fun.


I have more fun ideas coming...slowly. But they will come. :)
I am also dreadfully notorious for sharing big news here on the blog and then show up with a craft and never mention anything else. So here is the latest on my arm...I have an appointment Thursday and I am praying I can be cleared to DRIVE! I am pain free and can move a lot better but the arm is atrophied so I am working on that. I do not have a true cast. Just a splint and ace bandage that I can take off to shower and work on moving my arm. I am assuming some PT is in my near future.
We have had neighbors and friends blessing our family with meals, driving Cati home from school, and just loving our family up. I am humbled by our friends and church family.
But the reality of it all set in this week when I found out from a neighbor that the paramedics said people typically don't survive a fall like that. Then yesterday my husband was up in the attic and I literally started crying in a full fledged panic. Those who know me in real life know this is not really me. I guess seeing the ceiling move and buckle as my husband walked around that hole FREAKED ME OUT!
I'll catch up with you soon friends. Hugs to each of you!
♥
February 10, 2011
Cutie Valentine Class Party

I know some of you have asked me to post photos of the party at Cati's school but I was running around and did not get as many photos as I would have liked.
But here is what I got of their adorable day!

I made these mini cupcakes to look like roses. Or maybe carnations? Depended upon my frenzy, winging it method of icing these cupcakes. I poked little sticks through them and arranged them in a bucket as centerpieces for the tables.

I also baked heart shaped sugar cookies so the kids could decorate them with icing and Valentine sprinkles.

I love all the plates and tablecloths
The paper garland looked great with it but I did not take a photo of it hung up.
Sorry.

My Ella picked a perfect flower cupcake!

How cute are these kids picking the flowers?

My Cati putting her culinary genius to work.
She has mad skills decorating cookies.

Cati's yummy heart cookie. Just genius.
How bout how she threw it away?
I think I was insulted.

My dear friend Stacy is the other room mom for the class
and made these darling hearts for all the kids using a Silhouette.


She made these paper flowers for all the moms and a bouquet for each teacher.
She is a crafty genius!

Both the kindergarten and pre-k classes did this cute little song with hand motions
(you can't see Cati in the photos because she is in the back)
and then had a heart hunt outside for the kids and siblings.
Cati is playing with her prize for finding her 3 hearts.
I am completely digging her rolled down knee socks.

Ella found her hearts too!
Truly, she is thrilled. :)

And last but not least, the Valentine Smores was a last minute idea for their goody bags.
I had these little bags to just throw marshmallows in there but I figured a smores idea sounded so cute so I added graham crackers and valentine Hershey kisses.
I think next year, I am going to try this again with a cute saying like...
"Every Day I Like You Smore!"
What do yo think?
February 7, 2011
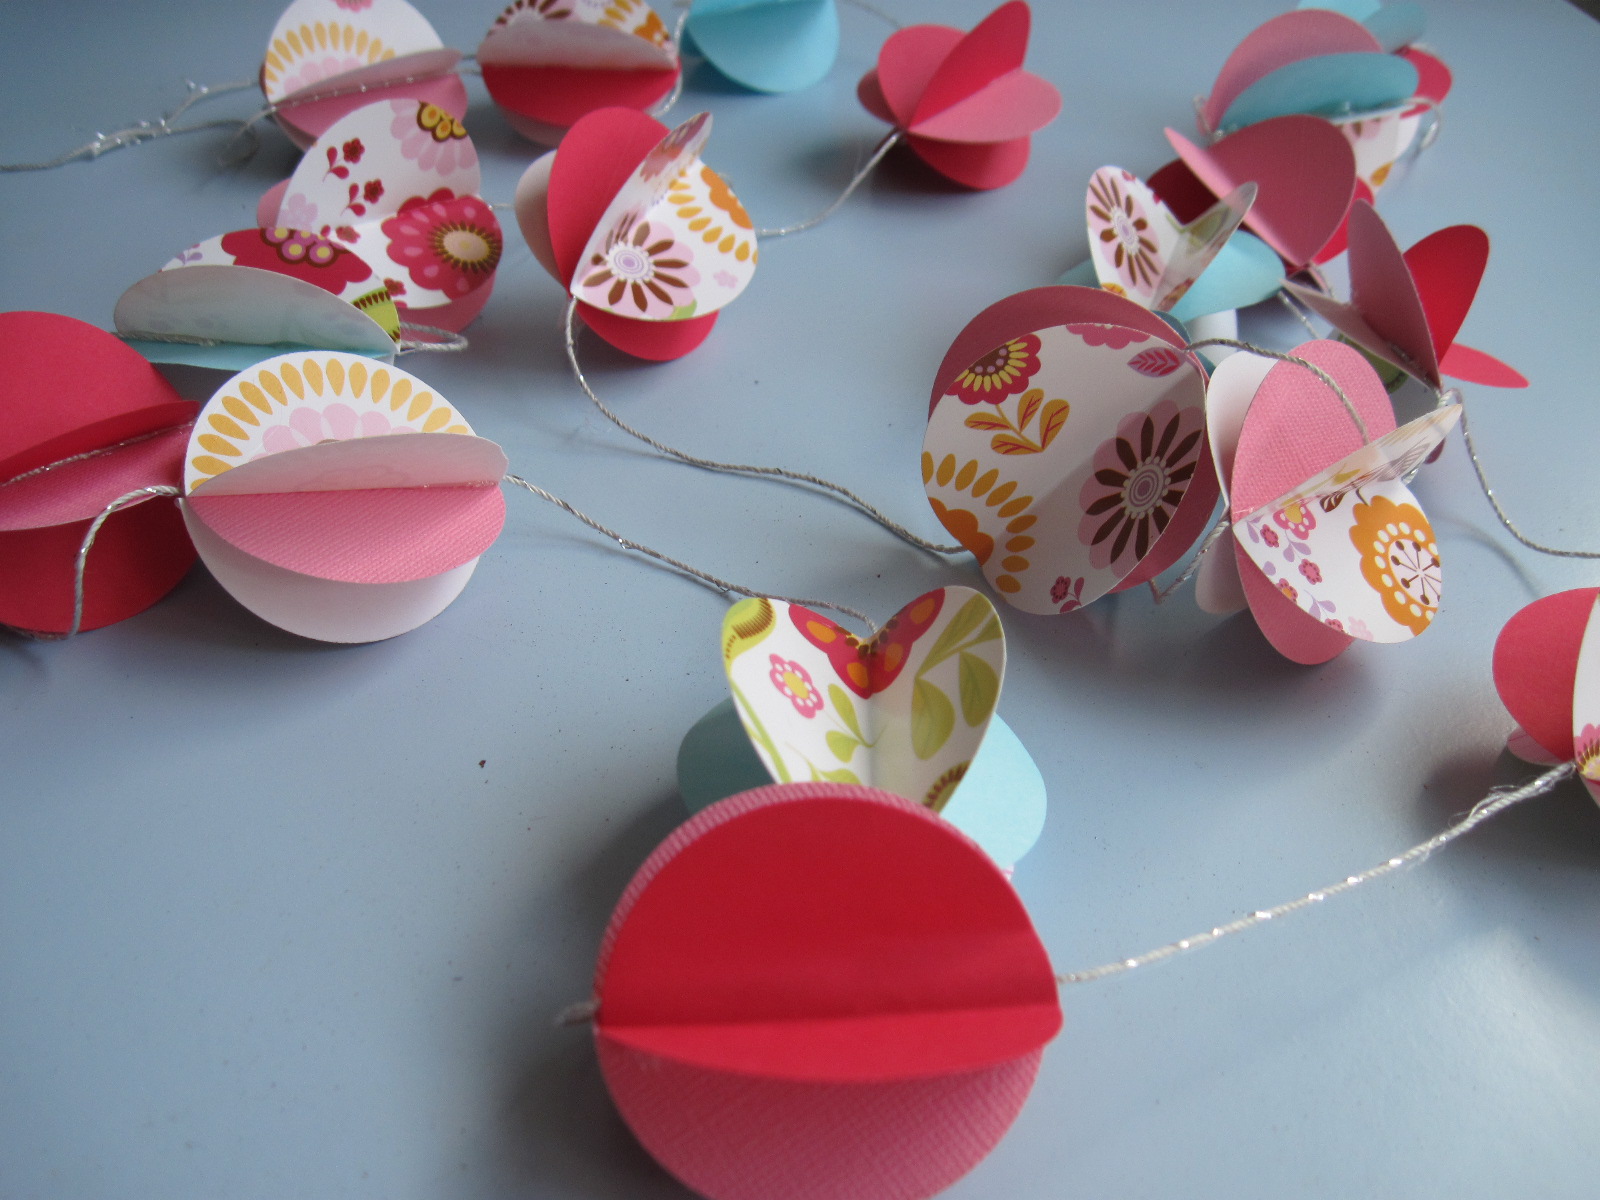
Valentine Party Paper Garland

I love, LOVE, LOVE, LOVE this simple paper garland!
One of my greatest delights is being challenged to craft something for the least amount of money while using resources I have on hand. I suppose that is what true crafting is all about. It is the fun of creating something and seeing what happens. And this paper garland: FREE. Yes.
And believe it or not...
This garland is made from paper off a couple doodle pads I have lying around to jot down groceries and phones numbers, card stock, scrap scrapbook paper, a circle paper punch and glittery string.
This garland is made from paper off a couple doodle pads I have lying around to jot down groceries and phones numbers, card stock, scrap scrapbook paper, a circle paper punch and glittery string.


I wanted the garland to match these adorable plates and napkins I picked up at Target.
I love that these are not conventional colors for Valentines Day since Cati's class of ten students has EIGHT BOYS and only two girls (one of which is my Cati). So I avoided the abundance of red and pink. Although y'all know me...the pinker...the better.
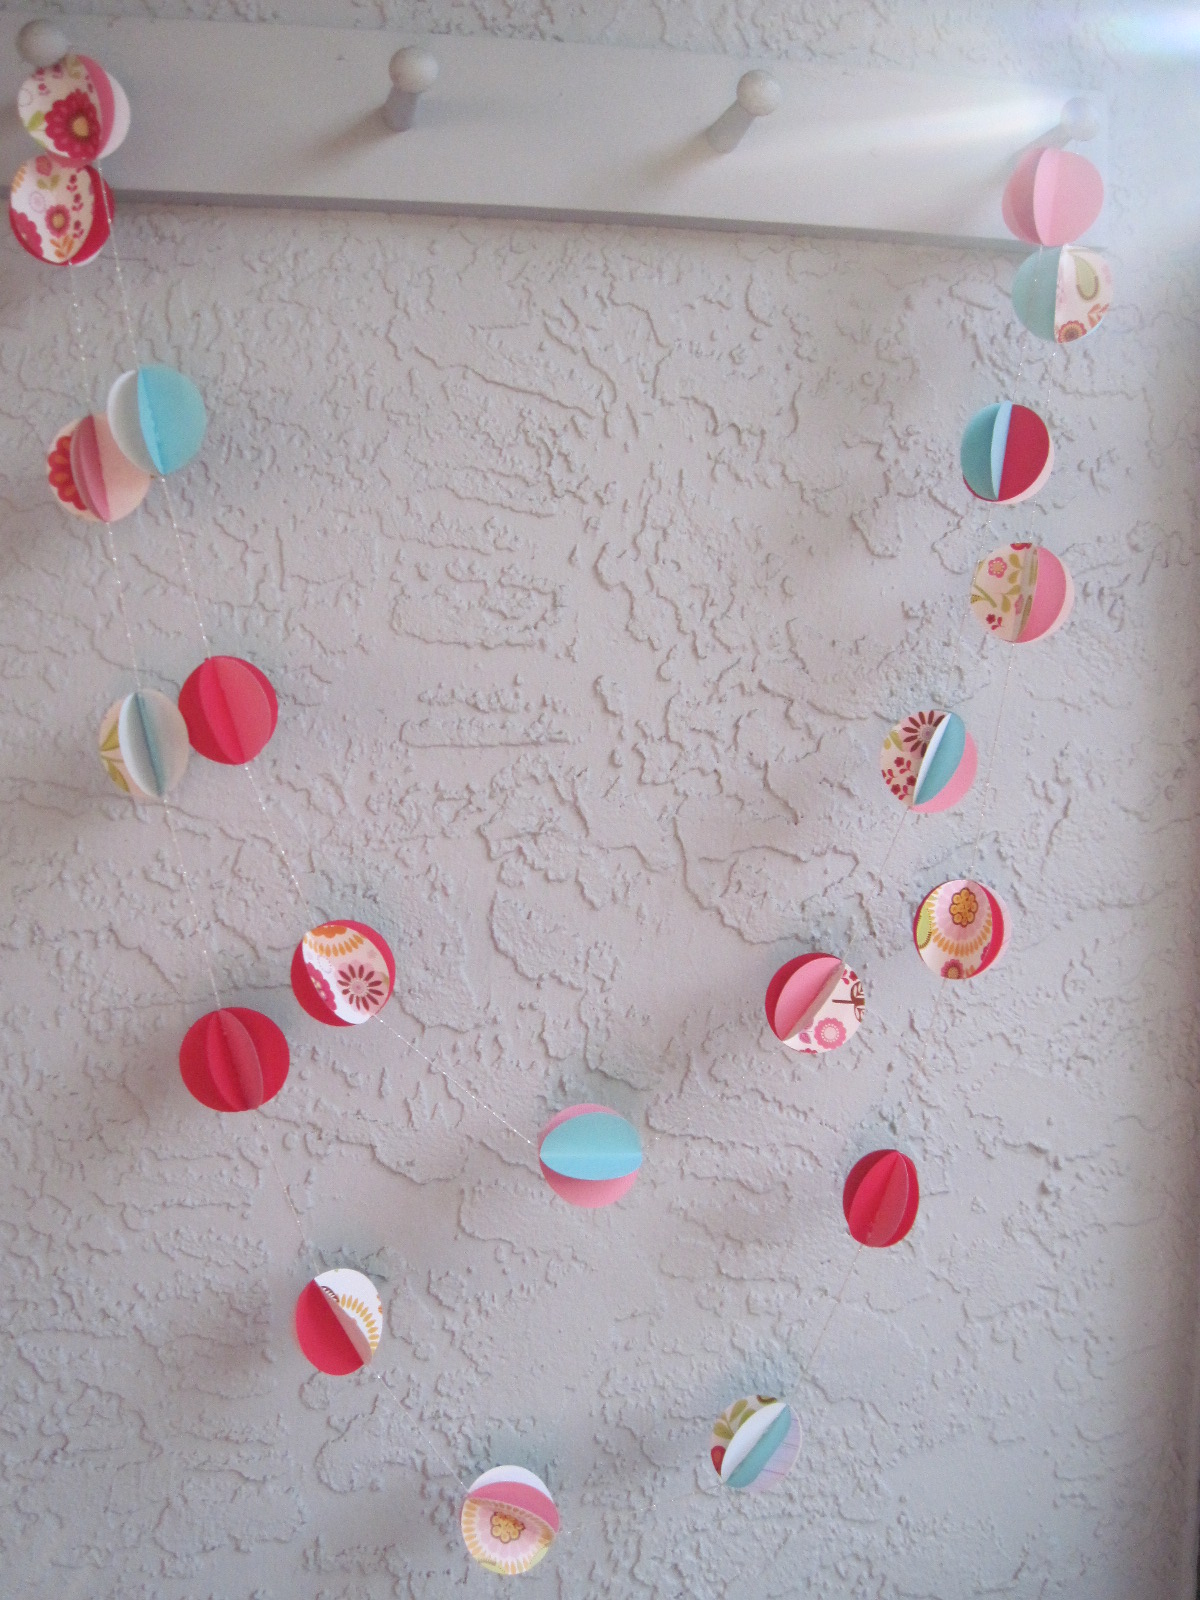
Each dimensional circle is just 3 punched circles
(2 folded and glued on each side of one flat card stock circle).
(2 folded and glued on each side of one flat card stock circle).
It took me about 30 minutes to make. You can't beat that!

I love the color combination.
It pops with festive color while being delicate and sweet!
It pops with festive color while being delicate and sweet!
I hung it in my kitchen and just smiled every time I looked at it.
Until I lost 7 years off my life walking through the kitchen and it fell down as I passed through.
Cheap scotch tape. :(


I hope to show you the pics after the fun party.
I have another project in the works but I have no idea if I will finish it in time.
Love and Hugs
XOXOXO!
Love and Hugs
XOXOXO!
February 3, 2011
Stitched Paper & Felt Valentines


If you want to try this yourself here is what I did:
Materials:
white card stock, red craft felt, embroidery floss various colors, colored pencils, and craft glue.
1. Cut your card stock (I used a craft mat and rotary cutter) to the size you want. Mine is 6 x 3 inches.
2. Cut your red felt backing slightly larger.
3. Cut out little felt hearts


Use running stitch to sew heart to the top of card stock.


Glue card stock to felt backing.


There is your simple and unique Valentine's with some homemade flair.
Just the way I like it. :)
