I am fearing that this post will be anti-climatic after already revealing the centerpiece.
So please comment just to be nice, OK? You are the BEST!
So please comment just to be nice, OK? You are the BEST!
The idea for napkin wraps came to me after I realized I did not have any pretty napkin rings. Or even napkins to match. I bought this pink coordinating fabric but still needed napkins.
You should have seen my high and low search for just the right napkins. Drove myself crazy. Drove my family crazy. But then Marshall's had these adorable teapot ones and I had to have them.
Even if they don't match since they will be rolled up or in someone's lap.
Even if they don't match since they will be rolled up or in someone's lap.
You probably don't not know this but I have this thing for teapots. I collect them.
So when I spotted this precious little embroidered teapot, on the perfectly colored napkin, that cost $3.50 for four...I was sold. It even has a bird on it. It looks prehistoric but whatever.
So to make these, you need fusible bonding tape and some velcro dots .
Iron-on adhesive tape saves you from sewing. Amen.
First, I rolled up my napkin to figure out the length I would need to wrap around a rolled napkin.
I needed about 6 inches around for it to be tight when I closed the wrap.
Now I tried measuring this out to help you if you wanted to make these but I realized this is pretty much personal preference. I made these to fit a tightly rolled napkin but they might not work if you wanted the napkin another way.
Then I used a piece of paper to figure out how wide I wanted it to be.
This happened to be too much so I just folded it to a width I liked.
I ended up cutting 5 x 8 inch pieces of material to make the size I wanted.
Definitely follow the directions on the fusible bonding tape. But here's what you basically do...
Fold the edges over twice and iron the crease.
Fold the edges over twice and iron the crease.
Put the fusible tape (paper side up) on the crease and press with an iron for 2 seconds on medium heat.
LET IT COOL!
Then take the paper strips off revealing a clear adhesive strip.
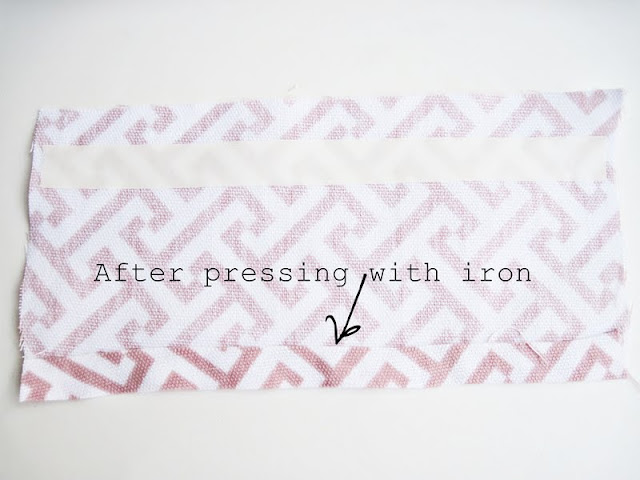
Fold the edge over and press with iron for about 8 seconds.
It should look like this. Do this on the long sides first then the short sides.
Now we have finished edges with no sewing involved.
To add the velcro dots, I placed the fuzzy sided ones on the edge of one shorter side. I used hot glue to reinforce them since the package said not recommended with fabric.
Note to self: Read labels before purchasing.
Then I wrapped it around a rolled napkin and aligned the scratchy dots with the fuzzy ones.
It would have sounded so much cooler if I could have said wrap and roll. Dang.
I just love this color combination together.
Here it is coordinating with the fabric chargers I made.
It would be so pretty to wrap ribbon around this with a little place card.
Add buttons or snaps instead of velcro.
Even decorative buttons on the outside on the seam would be pretty too.
And if it is not already obvious, this method works for making custom napkins too!
Add buttons or snaps instead of velcro.
Even decorative buttons on the outside on the seam would be pretty too.
And if it is not already obvious, this method works for making custom napkins too!
Tomorrow is the last day where I will show you favors and place cards before I set it all up Saturday morning. I have changed my mind 172 times so I wish I could give you a teaser but I still don't know.
See you tomorrow!
Hugs my sweet friends!


i am drooling with anticipation for the rest! not really, because that would be gross and a little weird, but i am pretty excited to see the finished product. the chargers, napkin rings, and centerpiece are amazing! the family nest is such a cute idea. can't wait to see what it all looks like with the birds.
ReplyDeleteoh, and this is just an observation, but the teapots totally look like someone etch-a-sketched them on the napkins! it's fun and shabby chic!
Beautiful!! Love the fabric for the napkin rings...almost looks like a chevron! Very cute! And LOVE the no-sew part!! I am hoping for a sewing machine for mother's day, so maybe I can conquer my sewing fear! Can't wait to see the rest!! Iknow its going to look gorgeous!!
ReplyDeletevery nice! Love the fabric.
ReplyDeleteCan't wait to see the rest. I show the chargers to my hubby and he thought that would make a great idea for the christmas tablescape we do!
These are so fun and pretty. It would be easy to make lots of them so you would have them for any holiday or regular day!
ReplyDeleteThis is a fab idea, and it looks fairly easy too. Very pretty.
ReplyDeleteAs someone who employs a sewing machine on a regular basis these days, your post made me laugh. Not because it's not awesome, it is.
ReplyDeleteMore because I too used to love all things "no sew" and would get a little excited to see those words too. LOL.
I can't wait to see it altogether!!!
ReplyDeleteLOVE the idea!!
ReplyDeleteFeel free to browse my personal blog or my photography blog. Prints are for sale. A portion of the proceeds made are donated to Faces of Loss, Faces of Hope. Find out more at www.nmmphotography.blogspot and www.thisisforyouboy.blogspot.com
Yes totally anti-climatic but whatever. Can't wait for the grand finale. Please take lots of pictures at the Gala pretty please. Thank you for your email. I can't wait to chat with you more but I know what a big weekend this is for you. Love you!
ReplyDelete