Image Map
Showing posts with label Printables. Show all posts

April 8, 2014

All You Magazine: Confetti Cork Frame DIY

So guess what?  This cute frame was in All You magazine...in December.  Can you believe it has taken me this long to post about it?  But thankfully it was a project you can do any time of the year. I was part of their fun Take This, Make That challenge where they ask two craft bloggers to take a material (in this case it was wine corks) and make a project for under $5 and in under 5 steps. 
Here is how I did mine...

October 15, 2013

Jack-O-Lantern Pinata


Hey pretty people.  Not sure if you caught this post over at Eighteen25 for their awesome September Spooktacular.  But my project was this adorable Jack-o-lantern Pinata.

And guess what? I have never made one before.  I have done paper mache and I figured a balloon would work but the rest was me winging it.  And I was surprised to find out that it's really easy!

Here's how I did it...trust me....

October 10, 2013

Apple Pie Kit + Printable


I'm praying you are not sick of the apple pie thing.  I promise today is the last day of all things apple pie.  But this one is short, quick, and super cute.

I have a thing for putting things in a little kit.  It makes ordinary things cute.  It's true. So this super easy apple pie kit would make a great teacher or hostess gift this fall.

August 16, 2012

1st Day of School Photo Sign + Printable

Oh my sweet day....how are you all doing? I am way shocked that it was been 2 months since I posted.  But you can't say I didn't warn you! I wanted to soak up my littles this summer and I did!  Still am, in fact.  We don't start school until September 4th!
But we have been having fun swimming, playing, eating ice cream, splashing in sprinklers, baking days, and lots of memory making.  Sigh.  The end of summer is so bittersweet. Both my girls will be in school so I may cry a lot and bury myself into crafting in my empty house. But I am excited to get back into crafting and living to blog about it.  So here is my first one to kind of get myself back on the grid in blog land:

July 12, 2011

Pretty Paper Party Things

Hi sweet friends!
(say that title 5x really fast...Pretty Paper Party Things.  So fun)

Today I have some more party ideas!
I have put together some paper type projects and I am excited to share them with you.  

Since we are having a picnic during a Florida summer...it will be a tad warm.  So what better idea is there then to make some girly fans!!
I hunted down a bracket frame image I liked, enlarged the image to make a paddle type fan and printed it out on card stock to be a sturdy template.  I used 8 x 8 scrapbook card stock paper which fit it perfectly.  I tried using 12 x 12 but I could only get one fan from the sheet and I felt that was a waste of paper.
I traced the template on the back of each sheet, cut it out and hot glued each one to a craft popsicle stick.
    SO EASY!  Took me one nap time to get it all done. :)

Here is a template to make your own.
Click here to download
Now our girly guests will be able to feel cool and say things like..."I declare!" in a southern accent.
(of which I do NOT have though many others say I do)

I am probably crazy for wrapping up utensils but I really think it adds an extra detail to a party to make it special. It also lets me buy inexpensive napkins and by wrapping them with 4 inch doilies and tying them off with twine...it makes for a lovely presentation.
I have to be honest that I was pretty much over the 4th of July Mason Jar Sippy Cups I made.  I loved them but I was excited to do something else with them for this party! I had an idea and I went on a hunt and was so happy with what I found at Michael's in the scrapbook section...plastic paper. How genius is that? And it is SO PRETTY! I figured y'all would like to see my revamped jars...
I loved how the one sheet looks like lace and the other with dainty pink flowers.  Perfect for my party theme and they are both clear and see through. The lace one reminds me of  overhead projector sheets.  Wow, that must age me, right? If you are wondering...I am 35. :)  The pink flowered one is more thick and opaque.  But perfect!
So I traced and cut the circles out and I am re-loving the jars again.  LOVING THEM! And no mess too.

If the plastic paper thing was not to be found, I was going to hunt for plastic placemats or something.  But I LOVE the look of these and I am so happy with how they turned out!

Happy Tuesday sweet friends!
♥ XOXO ♥

June 27, 2011

Picnic Theme Birthday Party Invitation

Hey Friends!  
Have I got a fun little party invite to share!  As you all know by now...the girls have birthdays coming up and they share a party.  So this year I decided I wanted to do a PICNIC THEME.  I have been tossing this idea around for months now and I still don't have a clear picture of what the party will look like.  But what comes to mind are old fashioned games I can make myself (ring toss, kick the can, hopscotch, sack races, etc), ready made picnic meals, and pretty sheets as picnic blankets outside. I am aiming for something simple and sweet.

So the first thing on the to-do list?
INVITATIONS!
 I thought it would be fun to send an invitation that looked like a picnic lunch.  The envelope would be the paper bag and using food images printed and cut out on white card stock, I made each item in the lunch...a sandwich, apple, milk carton, and napkin...contain the information for the party.
Anatomy of the Picnic Theme Invitation
Napkin (cocktail size) with Handwritten Message of Party Theme
Milk Carton RSVP
Apple Date and Time Card
Sandwich Birthday Announcement
 I made a little funny. Tee hee.

 I decided to fold the bag without taping it.  I originally planned on making the paper bags into envelopes and mailing them but I decided to save a bunch of stamps and hand deliver them.

But you still can do that if you need to mail your invites...
1. Place everything inside a flat and VERTICAL bag with the bottom still folded and facing up.
2. Fold the bottom up once.
3. Take the top half and fold into a triangle or point.
4. Fold it down and secure it with double sided tape or a glue stick.

To fold it like I did...
Lay flat with the bottom of the bag facing up.
Slide your picnic food tags/cards into the bag, all the way to the bottom while the bag is still flat.
 With the bag lying horizontal...fold  about 2 inches of the top of the bag down.
Fold the left side over to the right.
Label bag and tie twine around to keep the bag folded closed.  I did it this way so that when they untie and open it...it will be an actual paper bag instead of torn by tape.
This is the back secured with the jute twine. Baker's twine would be adorable too.
I actually tried doing this where the folded part was tucked under the flap but it would not lay flat so this way worked best.
How fun would it be to open up this invitation?

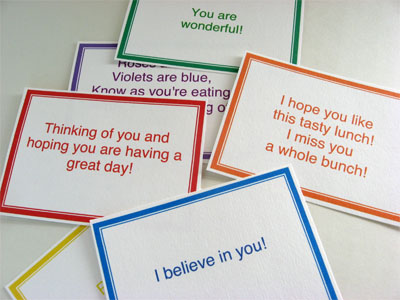
If you would like to make your own, I have a download of the clip art for you. This is a great idea for any kind of party and even great lunch notes too for back to school!


Click here to download (4 per sheet)


 Click here to download (9 per sheet)
Click here to download (4 per sheet)


What do you think of my fun invites?
You will probably see a  lot more of my projects for this party over the next month...hope you don't mind!
Happy Monday and Hugs to Each of YOU!

October 4, 2010

Lunchbox Notes: Printable Links


When I was a little grade schooler, I remember the first time I got a lunch note from my mom.  As I opened my snoopy lunch box (oh yeah) I saw the familiar napkins from home but wait...what was this?

A love note on the napkin in my mother's handwriting telling me to have a good day and she loved me. Awwwww!
WHAT A TREAT!

I remember the next day, being so excited to see the sweet note my mom left me on my napkins and...GASP!

NO NOTE!  Just a blank napkin.  Mocking me.

OK.  My mom worked hard to take care of me and I am sure this little thing was easily forgotten. I do not harbor resentment well into my 30's over this. Really. I have forgiven her. :)

But the positive impact it left stayed with me.  There is nothing more special then getting a little note from mom in the middle of your day just say I love you.  She is not even physically there and she can still communicate how she cares.

So when Cati started school this year I was adamant that she would get a lunch note every day.  So I just cut some hearts and circles out of scrapbook paper and kept them in a drawer in the kitchen.

She was beyond ecstatic!

Everyday she would tell me about her note and carry it around.  And when she sees me packing her lunch the night before, she brings me the note from that day and reminds me to put it in there.  And I always give her a big hug and tell her. "Look for a NEW NOTE in your lunch."  She gives me a huge smile that makes it so worth it.

But I got to thinking.  She can't read.  The PA's (parent assistants) at her school read them to her but I thought if I could give her some that are more visual and pretty, it would be that much more fun to get one in her lunch.

So began the Internet Hunt. And I was NOT disappointed!!!!!
Here's what I found!

Cute and happy food theme lunch notes at Oliebollen 
I absolutely HEART these simple and adorable love notes from Frog Prince Paperie

These gingham cuties so sweet and they give you room to write a personal note. 
I found these via Executive Homemaker

Alphamom has notes you can personalize and print or just write a quick note.

These are great for Fall and still have bold and fun rainbow colors.
The illustrator, Tricia Rennea has a great blog called Trillustrations that I follow with terrific free printables.

So make your little one's day with a love note!
Happy Lunch Making!