Image Map
Showing posts with label Two Tips Tuesday. Show all posts

July 10, 2010

It's Not Fun Anymore

Dang it!  I missed my ONE year anniversary with this blog.  July 5th was the day and what did I do?  

Nothing.

So guess what I decided to do instead?

Nothing.

Can you tell the blog glow is fading for me?  

It's funny.  I decide to give my blog to God.  Totally.  Fully.  And it is not so important anymore. This utterly shocks me.  I'm serious.  I used to lose a follower and it was hard to choke down the ice cream I would turn to in total defeat and failure, lamenting at how I LOST ANOTHER ONE. In this carbohydrate induced haze, I would feel like a blog loser. 

But suddenly it is not so important.  In fact, I am actually wondering why I MADE IT so important. Well, I am not wondering.  I KNOW.  It was to feel good about myself.

But I have decided that I want to do more. WRITE more.  Share my heart.  And funny as this seems, I have come to the conclusion that I don't want to do Two Tips Tuesday anymore. So I am saying goodbye to my weekly post.

And I feel f r e e.

No worries, though.  I will post a craft now and then if I think they are fancy or fun for THE BLOG. I am a craft girl.  Can't change how God made me.  But I realized I was a slave to that Two Tips post.  If you had any idea how much effort I put into them...well, it doesn't matter.  What does matter is that it was fun but I am done.  Poetic. Nice.

I am sure this is not a big deal for a lot of you but it is for me.  This is just one more step to my being obedient to God and doing His will.

Funny that I find His will much more joyful than my own will.  And I find that when I trust Him, He never fails me.  Ever. His ways are so not mine.  Well, good.

Because my way never works.

So I am humming a sad but a kinda happy little dirge to Two Tips Tuesday.

So long, Tuesday post.  Now you will arrive each week as just another Tuesday.

And that is OK.

July 7, 2010

Two Tips Tuesday: DIY Window Shade and a Fun Activity

I am NOT off on my days.  I am just busy because it IS summer, you know. And I have been wanting to really focus on the girls and getting a better schedule together.

Um....let's just say I am still TRYING to get it together. But I am getting there...:o)


So this is Two Tips Wednesday.  Not as fun of a ring to it but it will have to do...


TIP #1:  DIY Window Shade...Use What You Have
I had the hardest time getting a photo of this because the shade makes the room as dark as night and the lamp in there is like 2 watts.  No, really.  I am so serious. SO DIM!  But I loved that lamp and I had to have that lamp.  I mean, a polka dotted, pink lamp just begs to be bought. So the pictures are dreadfully dark but you get the idea.  
 
Here is what I did in a nutshell...
Took my cheap roller shade and spray painted it. I used Mod Podge on Dollar Tree letters for the "good night" on the shade. They are uneven because I was lazy and did not ensure they marched straight across the shade. I can be so craft lazy. I did not even stage this photo.  I consider us all tight like that now.

It looked kind of blah to me so I decided to embellish the bottom of the shade. I glued 2 coordinating ribbons the length of the bottom and the ring is none other than...a shower curtain ring. Give me time and I may find 101 uses for them.  I tried wrapping it with ribbon. Then yarn.  No go.  The thing would not cooperate do I left it and it suits me just fine. The flower is an iron on applique I had in my sewing box. I just hot glued it on. The total cost for this project was the cost of spray paint which was $3.99 and everything else was stuff I had on hand.


Tip #2:  Have a Photo Scavenger Hunt 
I really have struggled to find fun things to do this summer and I came up this idea born of my daughters obsession with the camera.  I daily take photos and if the camera is within her reach she starts snapping.  The other day I found about 8-10 pictures of her one eye and forehead on the camera. Praise God she is not blind.


Things to Find:

red car
bird in a tree
chalk on the sidewalk
mailbox with the flag up
bug
bike
a leaf that is not green
flower
a family
the number 7
water
an animal with four legs
something hot
something cold
a rock

Here's What You Do:

Look around your neighborhood and house to find all the items on the list. Do your best to let your child find all of the items.  When you find one, let your child take the photo .  If they do not have their own camera, show them how to point and shoot with yours.


After you have completed your scavenger hunt, develop your pictures at home or a 1 hour photo place.  (I just upload mine to Walgreens and pick them up).

Scrapbook your fun scavenger hunt as a memory to keep forever. They will be so excited over what they found and the photos they took.


Try to cater the list to your child's age and make it more or less challenging.  You can even create a theme.  Great summer activity to do with kiddies and grandkiddies.

Happy Hunting and HAPPY TUES...er...WEDNESDAY!

June 29, 2010

Two Tips Tuesday: Pretty Little Clothespins and Pom Pom Flowers


Tip #1: Pom Pom Flowers

I have been wondering how to make these flowers ever since I saw them in an issue of Coastal Living Magazine.  It was in the background and rather subtle but I loved them!  They were purpley, full of whimsy and fun, and added just the right simplicity to be so very ME! I had it in my head on how to do them but then I came across this amazing and simple tutorial and I knew I had to pass along this fun find to all of you. Everything about the blog  Domestifluff is amazing so be sure to check it out. 

The above picture is mine (and I made that vase years ago...like 12 or 13...in one of those great pottery painting places.  Who knew I would still use it this long?) and I chose to make my pom poms a bit longish since I liked the look.  This was super easy and super fun and it looks just fabulous on my table! 


Tip #2:  Pretty Little Clothespins 

Disclaimer:  To all of you seasoned crafters...yes, I am aware that this has been done before and you may have already seen it.  But maybe many of you are like me and love to see the same craft with a different spin. So I put a fun little organizational element into this one...

Are any of you like me and drawn in by ordinary things made super duper pretty?  Okay, because me too.  And I have wanted to make pretty clothespins with pretty paper for a pretty long time.

I am getting pretty repetitive.

So I whipped out some scrap scraps and had a blast!  Here is what you need...
Pretty paper  
(ok.  enough)
Clothespins
Mod Podge
Paintbrush
Nail File

1.  First you need to pull all the clothespins apart and remove the springs.
2.  Trace the top of the clothespin on paper and cut it out. There are different ways to do this but this is the way I did it.
3.  Use the paintbrush or fingers to coat Mod Podge the top of the clothespin. Smooth with fingers and add a finishing coat.
4.  I used the nail file to kind of sand the paper edges down to create a more finished and organic look.  I like that it ended up slightly distressed.
5.  Let it dry and just pop the springs back using one that is already assembled as a guide.

Easy peasy and you can use them for anything!
I am actually not finished with this blue and green set.  I am either going to put numbers on them or add cute little sayings like tasty, mmmmm, yum, and sweet.  I like the sayings idea the best.


This one was fun.  I had this scrap paper that had the days of the week on it with all these cute little chores and things.  So I decided to make Days of the Week Clothespins for some organizing flair.  They turned out so cute!  I love that Saturday has a glass of lemonade and Sunday has a pile of books with a cup of tea on it. 

If the pictures are hard for you to see...

Monday: Dusting polish and cloth that says "dust me"
Tuesday: Vacuum
Wednesday: Van that says "mom's taxi"
Thursday: Bags of groceries
Friday: Broom and dustpan (I could not fit the laundry basket on there!)

I made some for the 4th of July but forgot to take pics.  Here are some dark ones so you can get the idea...(the fun 4th of July printable is from here)...


Happy Tuesday Friends!

June 1, 2010

Two Tips Tuesday

Tip#1:  Update Your Kitchen Cabinets...On the Inside


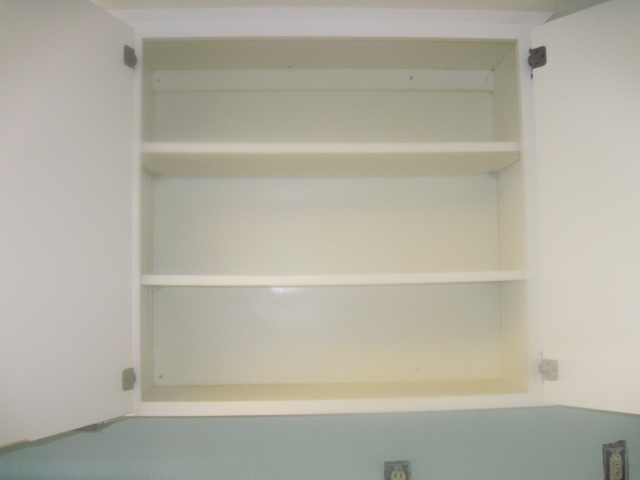
When we first looked at our house, I was kinda bummed about the kitchen cabinets.  They were not the best quality but I honestly like that they are white. But the inside of them were showing some yellowing and grime.  Totally grossed me out.  I thoroughly cleaned every inch of them but they still looked like this...


Look closer...

Ick, Ick, Ick!  
So I decided to paint them and I loved how they turned out!
So fresh and fun!  I am really loving the contrast between the wall color and the inside of the cabinets and the way all my white dishes pop.  It is so fun to open my cabinets!  It was a great way to update the kitchen and make things feel newer and more "me."

Tip #2:  An Old Window that Holds Memories


My dear friend Nicole has this amazing, old window at her house where she decided to commemorate her precious engagement and wedding moments with flowers!  The top left panel are the 3 flowers that were sitting on the alter where her husband proposed to her at our church.  They got married on that same altar exactly one year later!  The other 3 panels are petals she pulled apart from her dried wedding bouquet.

All she did was buy the window from an antique store, and got heavy, cardboard poster board that she was assured would not yellows with age, and went at it with a hot glue gun. That was it and so brilliant!

There are so many idea you could use with this old window idea...wedding photos of all your children or siblings, seashells from your favorite beaches, baby booties of all your children, etc, etc.  The list is endless and the look is just beautiful!

Happy Tuesday Friends!

May 24, 2010

Two Tips Tuesday: More Tips From YOU!

 
It has been great fun checking out so many of your blogs.  All of you are so witty, fun, creative, and inspirational.  I love getting a glimpse of your lives and seeing parts of your identity within the context of your posts.  I wish I have had more time to peek in on you but things are hectic in the Two Shades of Pink household.  So on with two great tips from two fantabulous blogs...

Embellish Unsightly Books for Gorgeous Display 
at Thrifty and Chic.

 
Alicia has an eye candy type of blog for me.  I swooned a bit on my first visit but remembered she is a real person and not some rock star and finally left a comment. I can scroll through her archives and find nothing I would not love to do or have in my home.  She is so talented and inspirational with her projects.  Like this one.  Oh, and this too! And the best part?  She does it on the cheap and everything is gorgeous and well done.  Love it! Love Her!  Go say hi and give her some bloggy love too!  How I wish she lived near me to be my on call decorator. And a friend to have coffee with too!

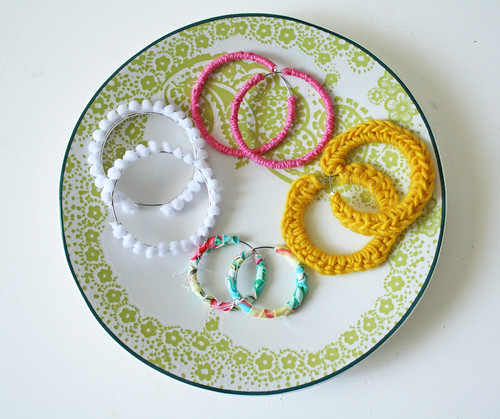
Amp Up Your Hoop Earrings 
with Jessica at Happy Together

 
I absolutely love Jessica and all of her creativity. Her blog is full of her fresh, innovative, and incredibly beautiful work including this and this and this. If I had the ability to sew or crochet like she can...life as I know it would be full of all things handmade.  All THINGS, I TELL YOU! I would crochet a car cover or sew cozies for all my juice glasses or something.  But alas...I am a novice sewer so I drool over other people and their talents. And their creations.  And this one just blows me away. Oh, and the icing on the cake?  That fabulous plate!

And here is a sneak peek on my own current project that has been shelved until we are completely moved in and I can find my crafty mojo again...

Happy Tuesday Friends!

May 11, 2010

Two Tips Tuesday: My Favorite TTT Posts!

So guess what? 
We are closing on our house FRIDAY!!!! 

Supposedly.

But...Woo Hoo and AHHHHHHHHH!!!

It was kind of short notice so I am trying to tie up loose ends, get stuff done with the new house, and finish up all the last minute stuff in our current house. 

It is a stress fest of gigantuous proportions.

So there is no time for tips, or crafty fun or ANYTHING! But I have carved out a wee bit of time to dive into my two tips archives and highlight my favorite ones with a linky loo for you to peek in on some oldies but goodies. Or maybe they are new ones you have not seen.

Without further ado...

Oh, as a special treat...I will do several.  Not just two. I am sweet like that.


 (not exactly my favorite but it's my weirdest tip that still makes me laugh out loud)


(same link as above and my all time favorite TTT post so I felt the double link was necessary.)

 FYI!!!
Because I will be consumed with house stuff, I decided that I am going to stalk some of your blogs and feature some of your tips, projects, or info that would be a great Two Tips post.  So if you are lurking around here and have a blog, follow me so I can peek in on you or leave me a comment with a link to a favorite post of yours. 
Don't worry.  If I am feeling some major blog love with some of your tips, I will check with you to make sure I can feature you.  Deal?

Happy Tuesday Friends!

May 4, 2010

Two Tips Tuesday: Memo Board with Knob Magnets & DIY Body Scrub

Tip #1: Re-Purposed Mirror turned Magnetic Memo Board with Knob Magnets 


This was a craft rescue that saved this little shelf's life. I have been carting around this mirrored shelf since college.  I have, what I still consider, a mystifying attachment to it.  I have no idea why.  I think I found it at Michael's or some other well known place.  It was not some vintage or antique find.  It was a mirror, framed like a window with a little shelf.  A dime a dozen. But I just love it.


One day our well fed (yet sadly, deceased) cat decided to pull it off the wall and broke the mirror.  I was so sad and hubby said we would replace it.  But it never happened.  I was struck with a stroke of genius (actually, it was a horribly misguided choice of decor and I am really not sure what led to this severely flawed decorating maneuver) but I thought I would cut a shirt and frame it where the mirror was.  Yes.  A shirt. I will wait while you digest this information and hover over the backspace button...

This is my genius at work.  I think I was going for a poorly identifiable shabby chic and I just ended up framing a shirt and putting it on my wall.  For years.  Oh, the horror.

So I decided a much needed upgrade was due.  With a little spray paint, sheet metal, frighteningly strong magnets, and drawer pulls and knobs, I made this...


This turned out looking so fresh and I am excited I will actually be able to use it. 
And it will be shirtless. :) 
If you are interested in how I did it, read on...


First, I took off the hardware before spray painting.  This is me actually putting it back on.  Just keeping it real.


Spay paint it.  Cut sheet metal to size.  I needed to use 2 pieces but had the advantage of having the window part hide the separate pieces.

 Ta Da!

Now on to the knobs...forgive the dark photos.  Did this at night...
I chose some inexpensive knobs and even shopped around my house and found the white ones from an old bench I have.

 I ended up using both the super glue and a glue gun for the magnets.

I first needed to fill this hole where a screw would normally go in this knob.  I hunted through my beads and found two that would work. I used super glue and used a tiny, crystal bead for the center.
I love how it gives the feel of a glass knob.


OK. Here is where my patience wears thin.  
I am not good at watching paint dry or in this case, watching glue dry.  And the superglue needed longer than the 30 seconds it called for.  Also, these super, powerful magnets were scaring the daylights out of me! As in, if they got at least a foot away they would snap together in thin air and I would scream with both girls sleeping. All six of them actually flew and attached to my lamp! Scared 7 years off my life. I kept putting the camera on the floor, petrified they would attach to it and ruin it too. A stressful craft, I tell you.
Another option is to use a glue gun and attach felt circles to the bottom of each knob so it will adhere to the magnet easier and quicker.


Make sure the felt is a smaller circumference than the knob so when it is on the memo board, you can't see it. This worked in a snap.  (But the superglue DID work great.  In like 5 minutes.  Yes,  I am THAT impatient.


I am going to have fun shopping for different knobs to add to this.  

I will be linking this project  to:


 Tip #2:  Yummy Body Scrub (Yes.  You can eat it...if you want to)


Squeeze juice from half a lemon
1 teaspoon of honey
8 tablespoons of brown sugar

This exfoliating scrub was something I found in Cottage Living Magazine about 5 years ago. I love it so much and I actually shared this tip on my very first Two Tips Tuesday EVER. Check it out here.  So I decided to share it again since a lot of you were not visiting me here back then. The recipe that time I adapted for only a few uses since I usually just use it on my face.  The recipe above makes a great body scrub in the shower.  I suggest you test it on small patch of skin before using it in case you are allergic to one of the ingredients.

 Makes a great gift too!
I put the scrub in a washed jelly jar, wrapped it with garden twine (found in the $1 section at Target...yippee!), and attached with printed label and spoon.


Here is how I did the lid wrapped in twine...
Thoroughly wash the lid and grab your trusty glue gun.


Begin to make a spiral circle with your twine.  I did mine to measure the circumference of the white pop top in the middle of the lid.


Once you have your circle formed, hot glue it to the center.  After that just place dabs of hot glue around the outside of the circled twine as you wind it until the whole lid is covered.

Happy Tuesday to all my friends on...